The Dakkajet received a bit of conversion work to it.
- I swapped the position of the vent hatch and the cockpit to give the jet a 'longer bonnet' so that it looks faster.
- I dislike the stock landing gear, and wanted to make at least one of the planes usable as a static model / scenery. With that in mind, I created a set of landing gear from the landing skids and a set of cheap 1/35 resin Stuka wheels off Ebay. These pin into little holes in the side of the fuselage and allow the plane to sit on the ground and look a bit like a proper plane that could e.g. land without exploding. Fortunately, the holes aren't particularly obvious when the plane is on its flight stand.
- For extra Dakka, I removed the two Port side bigger shootas and, using the breach of a Kannon and a spare 75mm Panther gun I had lying around, added a 'long barreled deffgun'.
I'm not sure how I'm going to use the long barreled deffgun in game at the moment. I could either hand wave it as the equivalent to two bigger shootas or use it as a D3 shot, S8, AP-1 gun instead. As I mostly play with fairly relaxed opponents, I don't think they'll mind that much and trading fewer shots for bigger boom feels balanced (ish).
In terms of painting, I chose a camo scheme for the Dakkjet from a BF109 and copied it as best I could for the jet.
For speed, I tried to keep masking to a minimum and sprayed the duck egg base (mix of old Space Wolves grey and Vallejo sky grey) first. I masked the top camo (Baneblade Brown and Castellan Green but then painted that by hand (with a little going over once the mask was removed), before giving them a light over-spray of the same colours to smooth out the brush marks.
I masked around the yellow nose cone and rudder before spraying. For this yellow, I used a mix of scorched brown and bad moons yellow with a later over-spray of Bad Moons yellow.
Finally, I handballed the wibbly side camo with more Baneblade brown and Castellan green, ensuring that the trails would end in sectors of their own colour for my own ease.
I had big problems with my airbrush at this point and this is the part of the scheme I'm least happy with because its grainy and a bit messy. Unfortunately, by that point I was committed to what I'd already done and didn't want to go back and start from scratch so I had to live with the scheme as it was.
The Burner-Bommer was a much more 'stock' build and the only conversion work I carried out was adding some extra uprights on the tail plane from spare ailerons and leaving off the landing skid (I've internally retconned it / am in denial that the plane has internal landing gear).
Painting was a lot simpler than the Dakkajet. It got sprayed Averland Sunset, then received a semi-opaque over-spray with Bleached Bone before a top coat of Bad Moons Yellow*.
I've found that spraying Bad Moons Yellow creates a not-entirely-wanted fluorescent effect and I was aiming to rectify this with the mid coat of Bleached Bone. However, as you can see, this didn't entirely work and it still came out quite fluorescent. I think this can be sorted by mixing some brown in with the top yellow (like the Dakkajet nose cone) and I'll give that a go when I next spray a Bad Moons vehicle.
The wing flames and glyphs got painted by hand (a bit of an ordeal) with a mix of black and brown.
Weathering.
Both planes were weathered and finished in the same manner.
- Using a sponge segment, a non-homogeneous mixture of a greys and silvers (remember that planes are mostly made of aluminium folks) was lightly dabbed around areas that would see the most impact with small debris / grit whilst flying.
- Both planes were sprayed with Vallejo gloss varnish. Once this had dried, a dark brown / black oil paint wash mixture was liberally sprayed over the model in sections at a time. This mixture was also run into panel lines and abutments to define these more.
- Using make up removers / Q tips, the excess oil paint was removed from the model, leaving deliberate streak marks on the planes to add dirt and show where the accumulated filth of battle had built up. This stage does not need to be hurried as oil paints take hours to dry and can often be reactivated with a little white spirit.
- The engines were given light coats of weathering powder washes and then dry-brushed silver for a 'rusty yet maintained a bit' look. Weathering powder washes consist (for me) of a mix of the weathering powder, Agrax Earthshade or Seraphim Sepia (depending on weathering powder tone) and a little Vallejo matt varnish. Using a wash like this retains the weathering powder's matt tone and 'feel' but skips the powder fixing stage.
- After drying overnight, the planes were given a coat of Vallejo matt varnish to seal the weathering. At this point, details like the pilot, accessories, bullet chains, searchlight, missiles etc. were painted.
NB. Painting the missiles separately (i.e. off the plane) and sticking them on later is going to make your life much better.
- The cockpit canopies** were painted by hand and then attached by PVA glue. The reason you use PVA glue is that both superglue (cyanoacrylate glue) and plastic cement will give off vapour which will fog the inside of the canopy and make it impossible to see your carefully painted pilot / grot gunner. Granted, the PVA bond won't be as strong, but it's hardly a weight bearing part.
I chose two different basing schemes for contrast with the planes. The yellow Burna-Bommer is flying over a scrapyard landscape and the darker Dakkajet is flying over the concrete ruins of a bombed out city. Again, I boobled a bit and must have touched the flying stand whilst building up the debris on the base of the Burner-bommer, because you can see blemishes on the flight stand. D'oh!
And that's it. Hope you enjoyed this.
I'm going to run round the house now, holding the planes making wrooow, boom, dakka dakka and burwooosh noises.
*At this point, I must apologise for still using paints that are years out of stock / availability. If you're following this and want to get hold of the equivalent of some of the paints I'm talking about, use this link: https://www.dakkadakka.com/wiki/en/Paint_Range_Compatibility_Chart
** Writing this, I've just realised that I've forgotten to attach the cockpit windshield to the Dakkajet. What a noob. As the photography is the first part of a post I do, its a bit late to go and find it now...
A couple of post's ago Jeff gave us all an update on the opening games of our Necromunda campaign. Em had attended with her Aegis Security Van Saar gang and returned full of Hobby Juice. She immediately went and ordered the Necromunda starter set so she could have her own rule book etc. In the starter set there are two gangs included. The muscle bound Goliaths and the leather bound Escher. The latter of which Em threw my way. Up until this point I was pretty indifferent to the world of Necromunda. I found the setting interesting, but I was really reluctant to get into yet another game system with yet another rule set to learn. I already have trouble keeping track of rules for Warhammer 40k, Warhammer Fantasy, Frost Grave, Bolt Action, Kill Team, Full Contact Tiddlywinks and whatever else it is we play. Saying that, having fresh plastic crack in my hands caused me to completely relapse and I dived headlong into creating a gang.
Using the Yaktribe tools I started creating a roster. Whilst doing that I started mulling over the background for my gang. I spent some time pondering what could an all female group be doing in the underhive to survive. Then a certain episode of Firefly where the residents of a brothel defended themselves against a posse of overly possessive men came to mind. I also wanted to try and incorporate the cyberpunk aesthetic as well, which led me to the club scene in the first Matrix film. Which led me to my gang being the owners, residents, and workers of an industrial metal/dance club, bordello, and drug den. Then the name came naturally to me. Then I realised that the name I picked I couldn't use as it was a Silverchair album (and probably a real place as well) so I reworked it into the Blacklight Theatre.
Now that I had a solid concept and a name I needed to work on their motivation and flesh things out a little. Reading into the background given by the others I decided that the Carrion Children had been providing protection services to the Blacklight Theatre and in their absence the staff had to take matters into their own hands. Sisters are indeed doing it for themselves. As I summarised to Charlie, the Blacklight Theatre is Coyote Ugly meets Moulin Rouge, but with more guns.
That's enough waffling from me, let's meet the girls.
In the centre is Scarlet, she is the owner, manager, and (in her words) Boss Bitch of the Blacklight Theatre. On the left we have Bobbi, who is head bouncer and to the right is Goose, who is bar manager and recruitment.
Next up is Flick, on the left, and Coco, right. Both of whom are dancers or bouncers depending on what mood they are in, or what drug they are on that night.
Finally we have our Juves, Shorty on the left and Spud on the right. They are mainly collecting glasses or dealing depending on what the clients can pay for.
For the painting I wanted to stick to a very goth/industrial aesthetic. I initially kept all the leather black. However that didn't really sit so well so I tried highlighting the black in colours matching each individuals hair. This also didn't work so I ended up painting them in either really dark red, green, blue or black depending on if it worked with their hair.
For each ganger I wanted to make each one stand out and what better way to do that then with their hair. Escher are all about the big hair and big guns so I could not not give them brightly coloured hair. It set each one apart. In some cases their names gave them the colour, Leaf for example couldn't be anything other than green. In other cases the colour gave the name, in Daze's example.
I've tried to make the weapons a little less uniform as well. Some are plain metal, some have their black coating still, while others have been customised, like Scarlets red Bolter.
There isn't much else to say. A simple rusty metal basing fits nicely with the boards and a few details here and there. I will admit these aren't the best painted models I've ever produced but I think they look striking as a whole and they are table ready so I can start playing catchup with the other gangs.
As soon as they've had their first few games I'll report back in.
I've waxed rhapsodic about the Genestealer Cults range a lot in my posts on the subject. I think they're wonderful. But they were just going to be NPC antagonists for roleplay scenarios until the latest models were released, and a massive determiner in pushing me to having a whole army was these guys:
The Atalan Jackels grabbed me by the throat. Realistic bikes, lovely weight distribution, fantastic quads, narrative driving stowage. They're wonderful. Oh, and I could immediately see their fighting style as it was featured in one of my favourite films of recent years: Mad Max: Fury Road (link 15+ and is the biker attack).
Deciding that I wanted more than a token unit of them I grabbed two box sets and set to making as varied a squad as possible. They're a nasty unit, especially with the stratagem that allows them to roar up their 14" move, yeet a trio of demolition charges at something and then blast the smoking remains with the pair of mining lasers on the wolfquads.
As far as the colour scheme goes I kept it straightforward. All the civilian vehicles in the army will be that "House Ortag Red" - or Vallejo Primer Red as we call it - so a mix of that and grey seemed wise. The riders were all in the standard Ortag Imperial orange jumpsuits and grey protective suits. I will say that these were a grind to paint. All cavalry and bike units seem to be but these took me a solid week of evenings to knock out 10 figures. An eternity in Jeff painting time. They're so worth it though. I love how they've ended up.
A big part of these models charm and individuality is the stowage panniers on the back of the bikes. I love how varied the kit carried is and how it looks like they are mutually supporting. I decided that for some of the weapons I would forgo the green PDF-looted look and paint them as if they were personal weapons that the Jackels carry on the job normally. Shotguns and obsolete grenade launchers to fling grapnels, flash bangs and smoke now firing frag and krak. I wanted them to look like slightly eclectic individuals even before they were tainted by xenos blood.
The big supportive punch comes from the Wolfquads. While I could have armed them with the excellent Atalan Incinerator, I've got a trio of forestry sentinels on the workbench that are doing that job. I wanted some hyper mobile anti-tank firepower and mining lasers are the way to go on that front. Must give a special shout out to the lovely visor for the pressure suit that all the 1st and 2nd generation types wear, gives the impression of what they should be for before a three armed alien is crammed into it. I've got a spare visor now waiting for another pressure suit to be needed.
The wolfquads gave me an opportunity to put in those spots of colour that lift an army. In this case the "caution, this thing in motion" yellow of the accessory mount at the back. All my vehicles will have these elements whether in handrails or "beware" bits. It'll really sell the industrial origins of the army and prevent it looking like a military force. At least... until the brood brothers turn up...
The Atalans weren't all that was on my painting station lately, the friendly neighbourhood refinery medical officer in the form of the Biophagus also rocked up. Dressed in nice clean scrubs in vile institutional mint green and sporting a wide variety of disturbing vials and surgical tubing along with his not-suspicious-at-all-oh-no-officer mancatcher full of needles... yeah, he's a bit disturbing. I love him. His alchemical familiar will be along later, I'm painting all the familiars not physically attached to a model in one batch.
Finally we have the Sanctus. I wasn't taken with the Sanctus kit at first, at least, until I saw the sniper variant. Now that was an assassin I could get behind. I decided to go a bit crazy on his painting and paint not one, not two but three individual camo schemes. Urban camo trousers, UK-style multicam outer cloak and night-time camo reversible lining. Keeping the grey armour and having the little familiar whispering about priority targets kept the model attached to the army visually, while allowing him a vast variance in appearance with the rest.
And that's me lot for this time. I'm working on the aforementioned Sentinels and then the second - and final - batch of purestrains. Getting to the home stretch with this project. My keen has really kept up and I can see a completed army in sight. I thought it might be interesting to see my remaining plans for the cultist part of the army and how I track progress so here's the current army plan and workometer:
Lots of green on that thing :D there's some oddities like needing one broodlord and owning two but that's just the way collecting goes some times. If 155 power seems like an odd number it's because it was everything I wanted from the codex. I'm making up another 45 power with Brood Brothers in the future to give me a nice round 200. So, Sentinels soon, but before that, round two of Necromunda. Very exciting. Until then
Em recently got very excited about doing some fantasy skirmish gaming and was looking around at building up a Frostgrave warband. Her research led her to the newly released Warcry, specifically the starter set, with it's generous pile of scenery and a feral looking warband she was intending on using as her Frostgrave warband. Since it arrived as a complete game we decided to give it a try. This would be my first real dip into the Age of Sigmar universe since they blew up the old World (it's still too soon). This is our thoughts on the game.
It's hefty, and so is the price tag. But if you break it down into 'normal' GW model costs, everything in there is really a steal (as I've discovered is usually the case with these boxed sets).
I have to be honest, the set first appealed to me because I could see the Untamed Beasts models working great with my newly purchased Frostgrave wizard (the Jaguar Boudi female shaman model from Hasslefree). The scenery and game mat are also clearly very Frostgrave friendly, so once I'd worked this all out in my head it felt like I was getting a pretty good deal buying the whole box instead of one warband on Ebay. Ah wargamer purchasing logic...
The contents, and in particular the models, are beautiful (I'm especially in love with the mad vulture things CAWCAAAW!) and the sprue layout/design made the models really simple to cut out and put together with minimal clean up. The one thing that seemed slightly lower budget was the quality of the rule book. I mean... it's fine. It's in colour, has a bit of lore, the rules and lots of campaign pathways for a ton of warbands but it's softback and doesn't have the polished quality that everything else in the box has. The setting of the Eight Points is very compelling. I can imagine this Mordor style wasteland with gnarly monsters around every corner and Archaons legions marching along the dusty highways to war in the other realms.
Playing it
The core rules are fairly straightforward to learn. Setting up is made interesting due to randomness of deployment, objectives and terrain layout - oh and then there is the 'twist' deck which can add another layer of random interest to the game such as +1 to all movement or 'snappy shitehawk surprise' (Raptoryx birds loose on the field). I love the 'destiny dice' mechanic that gives you random 'free' abilities to use each turn depending on the number of doubles, triples or quads you roll with your six destiny dice at the start of each round. Many of the abilities are unique to particular characters and I managed to forget to use several of these so probably need to add that to mental sequence for each activation (i.e. before touching model, FIRST CHECK if it has some awesome world ending ability to use!) The gorgeous terrain is also not just pretty to look at. In our first game I was forced to make a dash towards an objective sat behind some nasty 10ft chaos spikes. As lady luck would have it, I failed the terrain test and ended up impaled. Good times. The pace of the game is also good, despite it being our first game and there being a lot of rule checking and double checking, I think we were done in less than two hours.
Is it a gateway drug into AoS? Possibly... I have spent a fair bit of time eyeing up Gloomspite Gitz for a warband once I realised you could have Squigs running around eating everything. Although the standalone warbands are all delicious so there really is no need to start buying standard AoS units to have fun with Warcry. Assuming Maisey is similarly keen I'd like to try the 'campaign path' for the Untamed Beasts. GW has since teased an expansion book for the game which allows the introduction of Monsters and Mercenaries. Finally my poor neglected Ghorgon can stomp on people again! Hopefully not my people but.. you never know!
Models: The set comes with two complete war bands, the Untamed Beasts and the Iron Golem. These are really nice sculpts. Not too over the top like some chaos stuff can be, and very little to link them to the chaos of old. A few 8 pointed stars here and there but that's all. Each war band is really unique. There is virtually no customisation within the models. So there is no real way to expand, unless there is a release of reinforcements later. Each war band comes with a deck of cards covering all the stats and abilities for each of the models. That said the designers have decided to use glyphs to represent abilities and information, which can be initially confusing until you've learnt the 'language'.
Scenery: This is the main reason Em picked up the boxed set. The Terrain is very lovely. The buildings are nicely detailed and very neutral looking. There is a very little that make them specific to Age of Sigmar. We've used them for Warcry, 40k, Killteam, and we are fully intending to use it for Frostgrave. The collapsed head sytlings would probably make them suitable for any Lord of the Rings/Hobbit based gaming as well. One thing to be very careful with, due to the way that the terrain is setup during games (more on that in a bit) that there some specific ways to assemble the buildings that are not obvious in the instructions. There are a few resources online covering which bits to stick together or not.
Game Play: Setup for games is done using several decks of cards. There is a deck for terrain layout (hence the need for the scenery to be built in a specific way), a deck for deployment, a deck for the mission, and a deck for the twist (more on this in a moment). The deployment is dictated by the cards. the players need to split their war bands into three groups, Dagger, Shield, and Hammer. The deployment card states where each group is deployed and at what turn they arrive. The Twist cards introduce a little something something to each mission. These range from something simple to a stats increase to random lighting strikes to wild creature attacks.
The core rules are very straight forward. They are so basic that we spent a lot of time looking for rules that just are not there. I guess we're too used to other game systems and more complex rulesets. This makes it simple to pick up if you are new to war gaming, but lacking a little depth for experienced war gamers. The most complex mechanic is the how initiative is calculated. This involves rolling 6 dice, with the ability to add more through twists etc, and this roll determines who has priority and what extra abilities you get to activate during the turn. If you roll a lot of singles (so a result that is unique), then you have priority. If you roll doubles, or triples or more, you gain access to high level abilities that you can access during the game. Some of these abilities are open to any model, some are specific to characters etc.
The other big difference is that the attack roll has been boiled down to just 1 dice roll with the targets armour being accounted for in the models toughness. All the weapons also have two damage profiles, one standard and one critical. A roll of a 6 is always a critical. This results in lots of damage being dealt, but all models have a large number of hit points. Even so, a heavy hitter can take out a basic model in a single round (unless you are me and roll like a brick).
The core skirmish, with it's slim core rules feels like it might get repetitive quickly, but with the huge decks of cards, with more being released with the scenery sets, keeping everything random there could be a lot of life in it. Also in the book, which takes up the majority of the pages, is a collection of campaigns and the mechanics for more narrative play. There are a fixed set of campaigns in the book as well as the templates for creating your own. There will be further campaigns and scenarios released in the future in expansions or white dwarf.
Overall: I think it's a fun little game that should be easy to pick up and probably works best for a gaming group who are after a neatly packaged campaign system for a quick skirmish. Once you've got the rules down it should be easy to bash through a couple of games in an evening, or the majority of a campaign in a weekend. This is due to the minimal messing about that comes from the way the game is set up. You don't need to waste time thinking about the scenery, or objectives, or even deployment. It's all done for you letting you get on with the game it's self and enjoying the narrative of the game, as opposed to the mechanics of the game. This may not suit everyone, especially if you like the creative freedom and get your enjoyment from forging your own path. Others may simply enjoy walking the path that others have laid down. Even if that path has weird chaos beasts jumping out at them every so often.
Oi yoos gitz, shuddap an listen ta me. I iz gett'n some of da luckiest boyz togevva to go a krumpin. We iz gunna krump yoos and yoos. So yoos betta br'n yur best shootas cuz we'z got da ladz and da trukk an 'der r loads mor boyz on da wayz
Roughly *some* years ago now plans were announced for a new Beard Bunker fantasy campaign to be set in a brand new location, namely the Border Princes. As I already had a ginormous Chaos/Beastmen army I decided to dip my toe into something completely different and got hold of a Wood Elves codex.
My Chaos army was a little slap dash painting wise so for these dainty little pixies I decided to try and slow myself down a bit and spend more time on details. I started out with some Mirkwood Rangers from the Games Workshop Middle Earth range. Yes I know the scale police should probably lock me up for this heinous crime but, to be honest, it doesn't bother me how petite they are compared to the other Elves. As they are a scouting unit, being small and lithe kinda makes sense and they'll usually be out of the way of the main army bulk. Also the sculpts are JUST SO PRETTY I couldn't leave them out of my wood elf army once I'd clapped eyes on them. I spent a long time on the greens on these guys, using a few Duncan recipes along the way, but they really came together once I'd done the 'throw forest stuff at it' basing.
The third unit I put together was the Glade Guard. The old Glade Guard box was still available at the time but those god-awful heads just put me off completely. I decided instead to do a head swap and use the Sisters of Avelorn with the Wildwood Ranger heads popped onto them. I was a little worried my block of archers would end up looking like wonder woman clones but once painted up in muted foresty colours they came out ok.
Lastly I got myself a fancy, gravity defying Spellsinger to lead my small army into battle. This is Ithronel. The paint scheme is 100% borrowed from Duncan's 'How to Paint Alarielle' video on youtube and I a pretty happy with her as a centre piece for the army.
These models were finished roughly two years ago now, and have spent most of their lives languishing in the loft or the back of a cupboard. BUT the Border Princes campaign has recently been resurrected (hoorah!) and is scheduled to start in November 2019. I'm currently painting a Glade Rider unit to boost my points total up to 750. After that there are more ponies, archers, Eternal Guard and Sisters of the Thorn waiting in the wings, as well as some delightfully '80s Wardancers.
I'm looking forward to seeing how they do on the table but I honestly have no idea what I'm doing with a fast cavalry army (any tips welcome!) I imagine it will be a steep learning curve so expect tales of wanton deforestation in the near future...
Greetings all! Today's offering is a guest post from regular Bunker visitor Tom. If you like conversions, achievable batch painting and heavily themed 40K armies, this is a treat.
Tom: The whys and wherefores could fill an entire article, but for whatever the reasons I decided upon the release of the Ork Codex to collect a small Ork Army themed around the idea of an Orky interpretation of a WW2 air force. Ultimately I want a bigger collection of Orky aircraft that can join up with and/or against Charlie’s, Jeff’s and Mark’s Orks in future Apocalypse games, but as a starting point I wanted to build and paint a small legal and reasonably balanced army. I started collecting Orks since second edition, but I haven’t been playing much 40k for many years now, so this would be an entirely new army.
The whole thing has come together in a fairly Orky way, some units being built and painted long before I’d even decided on what other units would complete the army, but for the sanity of the readers I shall present things in a more rational and less chronolinear fashion.
So why WW2? Fun mostly. When I first thought up the idea of the army the concept was basically “Orks in Spitfires”. Probably because I was staring at one at the time and thinking how very Orky it was to have a low-tech aeroplane with eight machineguns on it. The original dakkajet.
So the fluff concept is a faction of Blood Axes led by Da Generalissimork*. He’s a madboy that has repeated visions of the “Two Worlds War, when all da oomies wot there woz woz fighting each uvver and it woz ded brillyunt”. Dedicated to this ideal of total war, rather than leading his own Waaagh, Da Generalissimork leads a mercenary band who fight for any Warboss who will take them from their spaceship aircraft carrier the HMS Ork Royal.
There’s a lot of spectrum of possibilities in a themed army. For something like this we have just regular Orks at one end, and “I might as well be playing Bolt Action” at the other. Ultimately I decided to go pretty light on the theme, and decided “Orks first, WW2 second”. I didn’t want to have to sacrifice anything that didn’t perfectly fit the theme, since that’s most of the most fun units in the Ork codex. The vision is WW2, but it’s being enacted by Orks.
So the theme will mostly be represented using heads from Spellcrow, some minor conversion work, and choice of paint scheme. I also discussed the use of symbology with Charlie and Jeff and decided against it. Whilst an RAF roundel is part of the iconic look of a Spitfire, I don’t fancy painting the Balkenkreuz on any of my models. It also feels a little anachronistic to the 40k setting.
Force Composition
Despite my fixation on an air force, I also needed to have something usable in a 40k game and reasonably balanced, which meant lots of boyz and not too many flyers. A small patrol and a large air wing might be legal, but it’s not sensible. A lot of the fun aspects of Orks in the new Codex are represented by Stratagems, so I knew I wanted a Battalion.
HQ – 1 Snikrot – 4
HQ – 1 Big Mek (Index) – 5
Troops – 20 choppa Boyz – 7
Troops – 10 shoota Boyz – 4
Troops – 10 Grots – 1
Elites – 10 Kommandoes – 4
Fast Attack – 2 Deffkoptas – 4
Heavy Support – 2 Mek Gunz (Smasha Gun) – 4
Flyer – 1 Dakkajet – 7
The shoota boyz are the new recruits. Generally assigned guard duty, they are sometimes also deployed to take and hold vital strategic objectives. Only Orks with enough self control to follow a battle plan and not charge in at the first sign of a fight will last long in this Blood Axe army.
Once they’ve proven themselves, they might get promoted into Da Paras, the choppa boyz using the Blood Axe stratagem to deep strike into combat (by parachuting out of the back of the Orkules). The best of the best may end up as Kommandos in the Special Air Service, led by Kaptain Dazzik Slurflinga (aka Snikrot).
The Smasha Guns were built by the meks to catch returning aircraft that are too shot up to land safely, but as soon as some Ork worked out how much fun they could have using them to smash up enemy vehicles, they quickly started disappearing from the bases and finding their way onto the battlefield.
Modelling
Dakkajet
Whilst I aim to have a Spitfire Dakkajet, I thought it would be fun to have a variety of Ork flyers themed after different factions. As such I didn’t want to start with the Spitfire in case I made some mistakes. Which I did. I settled on an American themed Dakkajet, with the Mustang P-51 as the primary influence. Following my guiding principle of “Orks first, WW2 second”, I decided not to get into repositioning wings and building landing gear to try to make the kit more like a Mustang. If I wanted that I could just Orkify an airfix model.
I decided on some creative choices with the part options, a bit of light modelling and let the paint job do most of the work. The pilot head with aviators was a must, and I stuck on the massive turbo charger for that american muscle car look. Then of course there was the propeller blades. Yes. In a jet. I know. Because Orks that’s why. A turboprop is a thing anyway, look it up.
Here I realised I'd made a mistake, due to the arrangement of the hilarious Ork landing skid** which I had already assembled there was very little room for propeller blades when on the ground. I trimmed back the rear claw to drop the tail a little more and bring up the nose, but the prop is still smaller than I had envisioned. In future aircraft I will have to reconsider the landing arrangement.
To attach propellers I drilled 4 holes around the tip of the nose cone and inserted 2mm cylindrical magnets (in alternating directions so they didn't pop out whilst the glue set). The blades are then simple plasticard sheets with cube magnets glued on the backs. This means the propeller blades will get knocked off rather than broken when bumped and can be packed more easily. I tend to do this with any vulnerable protrusions or antennae.
Kustom Kommandos
As there are only 5 official single-pose Komando models (including 1 nob) I decided to flesh the squad out with some converted boyz. The heads were easy, sourced from Spellcrow alongside the Para berets and the Guard helmets, but to complete the look they also needed backpacks. I found a few options online but none were quite right so I made my own. Digging through my bitz box I found all manner of detritus to cobble together and cover in pouches and weapons.
At this point it's easy to just glue everything on, but I think it's important to remember Orks aren't made of velcro and need straps. Ork bodies conveniently already have plenty of straps that could function and shoulder straps for the backpacks, and some loose wargear have bits that, if not intended to be straps, can be painted as such. But other items need straps added for that vital pinch of verisimilitude. This extended to the tankbusta bombs in the boyz mobs too. It’s a minor detail and I don’t exactly get down to modeling fastenings or anything, but I think it the different it makes has a good effort to reward value.
The images above should hopefully be enough without a detailed explanation, but I’m happy to dive into further detail in the comments if requested. I’ve tried using both superglue and PVA, but sadly it’s a case of choose your poison. Superglue will soak through the paper and instantly glue the paper to your fingers, so it’s very fiddly to work with but once it’s stuck then it stays put. PVA is much easier to work with but won’t dry for ages so unless you have the patience of Saint Eugenios the Incandescent you’ll be working with it whilst still wet which makes it harder to get tight straps lest you pull it apart.
Da Nobz
The nob that comes in the boyz box is… not great. Even overlooking his relatively tiny legs, the pose is very specific, especially if you want more than one in your army. I wanted two, plus planned to use a third to make my Big Mek. In the long term I plan to use the nobz box to flesh out my boyz, but since I have them and to save myself having to buy yet another box all at once, I figured I could do some conversion work on what I had to make them unique.
The Kombi-Burner used a shoota, with a trimmed down guard flamer offset underneath next to a fuel tank made from some plasticard tube with sheet plasticard roughly cut to shape to cover each end. I added a rifle stock from I-beam and square rod to give it some appearance of balance, since it was being held so far out in the pistol grip.
The kill saw was pretty straightforward, replacing the main claws with a saw blade (this one was my second attempt at making a saw blade). I took off the thumb claw, added in some turney gubbinz and on Jeff’s suggestion added in some rivets since the inner faces were looking a little bare without the thumb claw (dew claw??).
To differentiate the Big Mek, I reversed his hands, switching the power klaw to his right and sliced off, tweaked and reattached the index claw to be pointing, and using the big choppa left arm with a pistol hand and a kombi-rokkit made using a cut down burna-rokkit from the Dakkajet. Since the Mek would have only the best gun I gave him a scope and a larger barrel (bigger is better). The Kustom Force Field is another leftover from the Dakkajet. I also gave him lifts on the bottom of his boots to increase his height a little.
Finally the nob for the Guard mob I put very little effort into as I was fed up with the same old pose. He will be replaced in due course, so I didn’t even give him a Spellcrow head.
Mek Gunz
When I dropped into GW and demanded an entire Ork army, the staff were quite excited. Sadly they were only able to produce one Mek Gun (blasted rival Warbosses looting all the good stuff!). Since I already had a smasha gun left over from the Dakkajet (seriously, so many great spare bits!), and a couple of trukk wheels, I decided to make my own. It was basically a kitbash of bits with a plasticard shield built onto the front in the style of WW2 field guns.
I learned a few lessons along the way. It’s not very stable, it falls forward quite easily so I’ve had to add a little rock under one wheel so that it won’t fall over when placed on any surface not 100% flat. Also I think I should have angled the shield back instead of having it upright, however being paranoid about making something fragile I pinned the heck out of it during the build and don’t think I could cleanly remove it and rebuild it angled back.
The official model was built pretty much as per instructions, but I added another front shield on to balance up and increase the WW2 field gun look. I used two layers on this one to match up with the thickness of the plating already on the model. The whole thing is attached with more square rod and pins.
I’m currently splitting the six crew from the official set across both, since they have no in-game effect, but at some point I’d like to get some more since they make handy wound markers.
Painting
For the paint technique, I wanted something quick and dirty. Unlike the other… er… Beards? Bunkerites...? Unlike ‘the others’ I am not a master painter, I am at best a journeyman. I wanted my army to look ok on the table and not take me too long to paint (I am slooooow). Charlie gave me some guidance and we came up with the following basic plan (all using GW paints because that’s all I know):
Basecoat the models Mournfang Brown (since you can’t get that spray anymore this was replaced with Army Painter Leather Brown)
Drybrush the metal bits Necron Compound
Paint in the colours:
Waaagh! Flesh for the skin
Stormvermin Fur or Castellan Green for clothes
Extra details like teef, bling and berets
Redo Mournefang Brown for leather and strappy bits where necessary
The primary colour of the army is a khaki green, mostly Castellan but the odd variation when it seems appropriate. The secondary colour, being grey, adds some variety. I added a complementary detail colour of Iyanden Darksun/Averland Sunset, just a little bit appearing in most units.
Vehicles and other bits of gubbinz all start off drybrished silver, but then where appropriate they are painted over quite roughly with a colour, making sure not to get right to the edges. Where something is mostly bare metal, I throw in a few bits of Balthasar Gold (which looks pretty brassy to me) or, less often, Retributor Armour (which actually looks gold). Wires are picked out in Mephiston Red.
The Kommandos got a totally different treatment, to make them stand apart without standing out. No rusty crap weapons for them. They were painted black, drybrushed grey for a lazy highlight, and their weapons painted Leadbelcher and washed Nuln Oil for a cleaner metal finish. The nightvision goggles were painted Ceramite White then given a wash of Biel-Tan Green for a quick glowy green effect.
Now that I have a baseline functional army, I can start adding new fun units to swap in and out, and in time maybe expand the army without it being unbalanced. Here are a few schemes I’m already dreaming up.
Chinork
I can’t not. I love air-transport (see my entire Raven guard army). Personally I don’t love the design of the official Chinork, and want something more enclosed and helicoptery. I plan to make something a lot more like the UH-1D. I know it’s a bit late for WW2, but Orks probably can’t tell the difference. Fun before factual accuracy. Since Jeff pointed out that “Oomie’s don’t surf”, the mob inside will all be wearing M1 “GI” helmets except the nob who will have a cavalry hat and yellow scarf. Because reasons.
Stormboyz
Conspicuous in their absence (mostly because I already had some Komandos and I couldn’t have too many non-troops mobs), no aerial themed Ork army could be complete without them. I plan to have a mob of 30, led by Zagstruk. Since Zagstruk is a Goff (why?!) this means legally I need to put them in a separate detachment if I want to keep my Chapter Tactics Clan Kulture rules. Whilst the people I play with are all pretty relaxed and wouldn’t mind me swapping Zagstruk’s clan (see my Raven Guard version of Telion), I try to keep things book legal wherever possible and all I need is one squad of Grots to go with Zagstruk to make a Patrol. The downside is that Zagstruk can’t then fill one of my Battalion compulsory HQ slots, the upside is that actually the Goff Clan Kulture is probably better for Stormboys than the Blood Axe one.
MOAR PLANEZ!
As discussed previously the Mustang was just the test plane. I want a Spitfire Dakkajet and a Messerschmitt Bf 109 Burna-Bommer. Maybe a Zero to round out the four main factions?
*Sir Not-appearing-in-this-initial-army.
**As funny as it is, it's also straight out of real history. The Messerschmitt Me 163 Komet, the first rocket powered interceptor, had a simple landing skid and one of the major drawbacks*** was the back injuries caused to pilots with the hard landings.
***Another wonderfully Orky drawback being that it was so fast it barely had time to shoot at its targets between getting into range and being past them.
Here's the first squad I finished for my off-brand Ultramarines, the Cobalt Scions. They're even more Roman than the Ultramarines, in that they'll have Roman flaws as well: dangerous levels of personal ambition, an obsession with venerating and exceeding the deeds of their ancestors, and the naivety to think that the humans already living in the area they're going to claim as their new fortress monastery will be happy to hand over the reins of power.
Heraldry I'm breaking from the standard rules of shoulder trim indicating company colours. Instead, the left kneepad does that job, with the squad number painted onto the right shoulder pad. Everyone gets gold trim, because gold looks great with blue. The chapter icon represents the Gauntlets of Ultramar (again, a bit of ancestor worship).
The eagle-eyed will note that I appear to have some marines from squad 1 and some from squad 2 in this post. That's because there'll be some bare heads coming later, sprinkled among the units, but initially I just wanted to focus on learning how to paint Mk.X plate.
Of course, an unexpected downside of this was my other half asking "why do they all have M&Ms on their knees?"
It cannot be un-seen. I have accepted my chocolaty fate.
Painting I've followed pretty standard G-Dubz paint recipes here. The only exception is the gold, which I basecoat silver before putting any gold on, which helps offset gold's natural transparency. For ease, the stages for the major colours are laid out below.
Blue:
Spray the whole model Macragge Blue.
Line in the crevices with Nuln Oil (if your Nuln Oil has gone dodgy, as mine has, a mix of medium and black paint will do just as well).
Highlight with Calgar Blue.
Edge highlight with Fenrisian Grey.
Point highlight with a 50/50 Fenrisian/white mix.
Go back over with thinned Macragge Blue, covering any mistakes and softening up the transition from the base spray to the initial Calgar highlight.
Red:
Mephiston Red.
Agrax Earthshade.
Highlight Evil Sunz Scarlet.
Edge Highlight Wild Rider Red.
Black:
Basecoat with... black.
Overbrush with thinned Eshin Grey.
Highlight with Eshin Grey.
Edge highlight with Dawnstone.
Silver:
Basecoat Army Painter Gunmetal (leadbelcher would do).
Nuln Oil Gloss.
Edge highlight with a light silver.
Gold:
Basecoat gunmetal/mid-silver.
Basecoat gold.
Reikland Fleshshade Gloss.
Edge highlight with a 2:1 gold/bright silver mix.
Basing:
It's been done to fit in with my temperate/grass board, and is consistent with my Imperial Guard army so that they'll look coherent when operating together. Which they will. A lot.
How long does this take?
I'm probably clocking about five hours per marine, give or take. I've been pretty slack with some elements of the mini; hopefully the work I've put into the blue will distract from that. The challenge is to accept imperfections, or I'll never finish them.
Where'd you get those fist icons/power fist/backpack unit?
From the Imperial Fists Battleforce Box GW put out for Christmas 2018. The signum/scanner/thingy on sarge's backpack has been slightly converted so that it's looking in the same direction as his helm, suggesting a mind-impulse link.
What's their background?
Ohhhh boy I've gotten overexcited. Again. I'll have to cover that in a future post; maybe when I've got the next five marines done. Which won't be for a while, as right now I'm working on some Fantasy stuff.
Is your gang tired of a constant stream of slaying, pillaging and loot carrying?
Do you need a giant robot with an en-trained Xenos insect brain to do your heavy lifting and face smashing but you’re too short of time in your hectic gang warfare life?
Beautifully Painted. Might have taken a while to do though...
When Games Workshop first showed the Ambot model off, I knew that I needed one in my life. I also knew that I didn’t want to use their relatively ‘factory fresh’ paint scheme because
A) I’m lazy and
B) I wanted mine to look battered and heavily used – like the piece of tunneling equipment it is.
I wanted to get it painted quickly – preferably between the time I dropped my Son off at school and the time that my wife picked him up.
The challenge was on – paint an Ambot in 6 hours.
I did cheat a bit, the model was already assembled and primed black when I started and I did the basing after bedtime.
In terms of assembly, I cut off the silly looking rotary saws and under-slung weaponry - That melta would get ripped off as soon as the Ambot had to start using those claws on rock.
So onto painting. I painted the head separately as I was worried I wouldn’t be able to get decent access if I glued it on initially. So I superglued it to a bamboo skewer where I knew I could get access all round it and proceeded to paint the body in these handy steps, and forget to photo the head like an idiot.
Step 1. Make like It’s the 70’s and paint it brown.
Calthan Brown to be exact – the whole thing.
I did this quickly with a wide, flat drybrush.
Step 2. Drybrush it silver – Chainmail.
This wasn’t a particularly neat drybrush and was sloppier than I’d do to get an effect on a regular model but this is partly intentional as a starting point.
I used the same flat, large drybrush to stipple the redder toned brown over the entire model, At this point, I still wasn’t that concerned about neatness, as long as the paint was appropriately runny – i.e. not too thick to obscure detail but not running everywhere once it was down.
Step 4. Stipple with Orange – Macharius Solar Orange then Blazing Orange
Like the step before, but I was more careful to limit coverage and not obscure the previous colour. I started with a drabber orange with a more opaque tone before moving onto a more vibrant orange in smaller patchier areas. The trick with this is to get progressively smaller areas of coverage so that you still get the 'lower' colours showing through.
This may take a while to dry, so go and help yourself to a cup of tea and biscuit. Yeah, a good biscuit, not a digestive. Have you got anything better than shortbread? Oh yeah, with a chocolate filling? That’s the one.
I used a small drybrush to apply a grey base colour to the body of the Ambot and a Blue to the arm.
When doing this:
1. Unless you want to do multiple coats (i.e. 2+), pick strong base colours. Yellow would not be your friend for speed at this point.
2. Get the paint into the crevices – this is where it would be most protected from wear and tear. Be less concerned about covering flat plates and edges – this is where paint gets smashed off in double quick time. If you want guidance, go and look at a JCB bucket – either online or IRL if you live near a construction site.
3. Think about which areas would get most wear. The claws and arms are going to get the paint taken off them much faster than places like the back and torso of the machine.
MARK MISTAKE: I chose two different colours because I wanted it to look like the arm had been replaced and no-one had bothered to re-spray it (Classic cut and shut). Because the contrast between the blue and the grey isn’t that obvious, I don’t think the effect quite works. .
Tunneling machinery gets battered to all hell and at the end of a shift, any rock exposed surfaces will be bright steel. If left, these will rust quickly.
I use a combination of Seraphim Sepia, various rust colouring weathering powders and Vallejo matt varnish mixed into different colours to apply light coats of rust to the model.
When doing this, I tried to vary the tone across the model and use lighter tones for areas that would have seen more recent abrasion and the darker colours for areas that only infrequently get damaged / scraped.
I used a bright silver to accentuate those areas of the model that would receive wear – mostly claws, front edges, feet and sliding contact areas. To accentuate the roughness of the model (and to save time) I used a small dry-brush for this.
There are various hoses, lights, mandibles, gears etc that also need painting and I painted these. I took the opportunity here to paint joint areas with a mix of typhus corrosion and Nuln oil to emphasise the build-up of dirt and mud around highly lubricated areas. I also finished the head and stuck that on – being careful to scrape away primer from the contact points so that the head would have something to stick to.
Aside from basing, the Ambot is now painted and ready to go. Set it to digging up useful stuff in your mines or for digging out useless stuff from your opponent’s skulls – the choice is yours.
"I say Carruthers. What time would you say it is?" "Well, sir, I'd say it's Dwarf O'clock." "Dash it all Carruthers you are quite correct! It is Dwarf O'clock!"
Yes, the drums of war are sounding in the Old World once more. Our Border Princes campaign is coming and the Dwarfs of Karak Hoch are answering the call. Sound the horns, beat the drums, march to war, oh and paint many, many little mans.
It's fair to say I have rather a lot of Dwarfs. BUT IT IS NEVER ENOUGH! Ahem. I wanted to take the new burst of fantasy enthusiasm to paint some of the all-too-massive pile of Dwarfs waiting to join the Stormborne ranks. In this case it was a pair of 25 strong Dwarf Warrior units equipped with Great Weapons for what is technically called "Even More Killiness".The unit on the left is the Karak Hoch Fyrd and are the first regiment raised entirely from the new settlers in the new hold from our previous campaign. As such they proudly bear the rune of Karak Hoch on their banner and march to war in it's name. The unit on the right is the Smithy Halls Muster, a regiment of Smith's apprentices - very used to swinging big hammers - marching to war in craft brotherhood.
I'm using the very old Dwarf plastics as to be honest, I'm not all that fond of the previous ones. It's one of my very deep regrets of the move to Age of Sigmar that I'll never get a modern, beautiful box of standard warriors; thunderers; and crossbowmen in the mould of the new ironbreakers and longbeards. Sigh. In order to get a little variety into the quite samey sprue I used spare great weapon heads from the longbeard/hammerer kit to sprinkle some fancier weapons among the basic ones. The other way to improve variety in Dwarf units is beard colour. Line up all the identical heads and make sure that each has, at minimum, a sliiiiightly different hair colour. It doesn't take long and really helps kill off the twins problem.
Worth a closer look - as most of these models are the proverbial sows ear that I've attempted to silk purse - is the leader of the Smithy Halls Muster: Sigrun Alairksdottir. Sigrun is the shop steward of the Apprentices and a lethal swing with her self-made all-metal greathammer. She's a Hasslefree model that I've been looking for a place in the army for a little while now. She's dressed in the standard Stormbourne blue/grey (Incubi Darkness highlighted with Russ Grey) and everything else is in shades of leather. All the better to emphasise her lowly status.
Speaking of lowly status, Dwarfs revere their traditional war machines. They pour love and ornamentation into them and trust them as they could never trust a living soul. Then some maniac builds something "new" (a word old engineers spit like a curse) and creates some abomination like Gyrocopters or in this case a Flame Cannon. Sure, they've been middling successful for a century or so but that's no-where near long enough for a sane and sober Dwarf. As such, they are crewed by the young, the mad or the reckless. Sadly there's a good reason for that. These machines are deadly but when they go? Whoooo boy they go large. One wrong move and you are geography.
Now, while I am Dwarf-ey to my core, and while I love the design of these models oh so very much. Dear gods in any available heaven they are evil to assemble. It made me realise how spoiled we are in these wondrous days of plastic everything. The large lumps of metal are all eeeeever so slightly misaligned or twisted and trying to figure out sub assemblies to physically get paint brushes into was a nightmare. Suffice to say, I enjoyed painting them waaaaay more than I enjoyed building them. I'd toyed with a lot of different schemes for these weapons but eventually leaned in to the untrusted, barely ornamented look. All the fancy bits are from the casting process, not any love after the fact. Everything got painted in oily cast iron with brass fixtures and fittings. I heat stained the muzzles going through the temper colours from straw yellow to purple with thin ink washes. I then covered most of that with black soot drybrushed on.
I wanted the crewman to have a "Proper Protective Equipment" look about him so went with steel armour and that greenish hue that thick glass has. I figure they just bent an inch-thick rod of glass into shape and went with it for the visor.
The remaining crew (one borrowed from a bolt thrower kit to get some variety in) were painted in the standard Stormborne blue-grey and white with hair colours all indicating young Dwarfs. No greybeard is going within a mile of those Grugni-cursed contraptions (muttering fades to black).
And that's yer lot! It has been super fun returning to the Dwarven fold. It's been long enough that it's fresh and exciting to paint them again and rediscovering just how fast and easy they are to bash out has been a delight. I'm hoping to get at least the units of Irondrakes and Ironbreakers that I have assembled painted by November. Maybe even more. The Stormborne host will be well reinforced when it marches south. Buah ha ha haaaaaa! Until then
"Is there anything you want to do?" I asked Mark. "Yeah," he said, "watch Fury Road with me." It always was, to be fair, just about the most Mark film in existence.
I was asking him because we both knew he didn't have much time left. You see, today's post is going to be heavier than our usual fare. A good friend to all of us for a decade or so, and a regular contributor to this blog since its inception, Mark passed away on Saturday the 19th of October following a long, painful struggle with colon cancer.
This is a hobby blog, so this will be a hobby eulogy of sorts, sharing our thoughts and favourite memories of the orkiest gamer there ever was. Anyone inspired or moved by the contents of this post can lift our spirits by contributing to the Movember campaign that Andy is running in Mark's honour. You even get to vote for what kind of 'tache Andy will grow.
Next week, we will be sharing Mark's final blog post for the Beard Bunker, in which he'll share his reflections on the hobby, and the joy it brought him, even as he sped toward a profoundly premature grave.
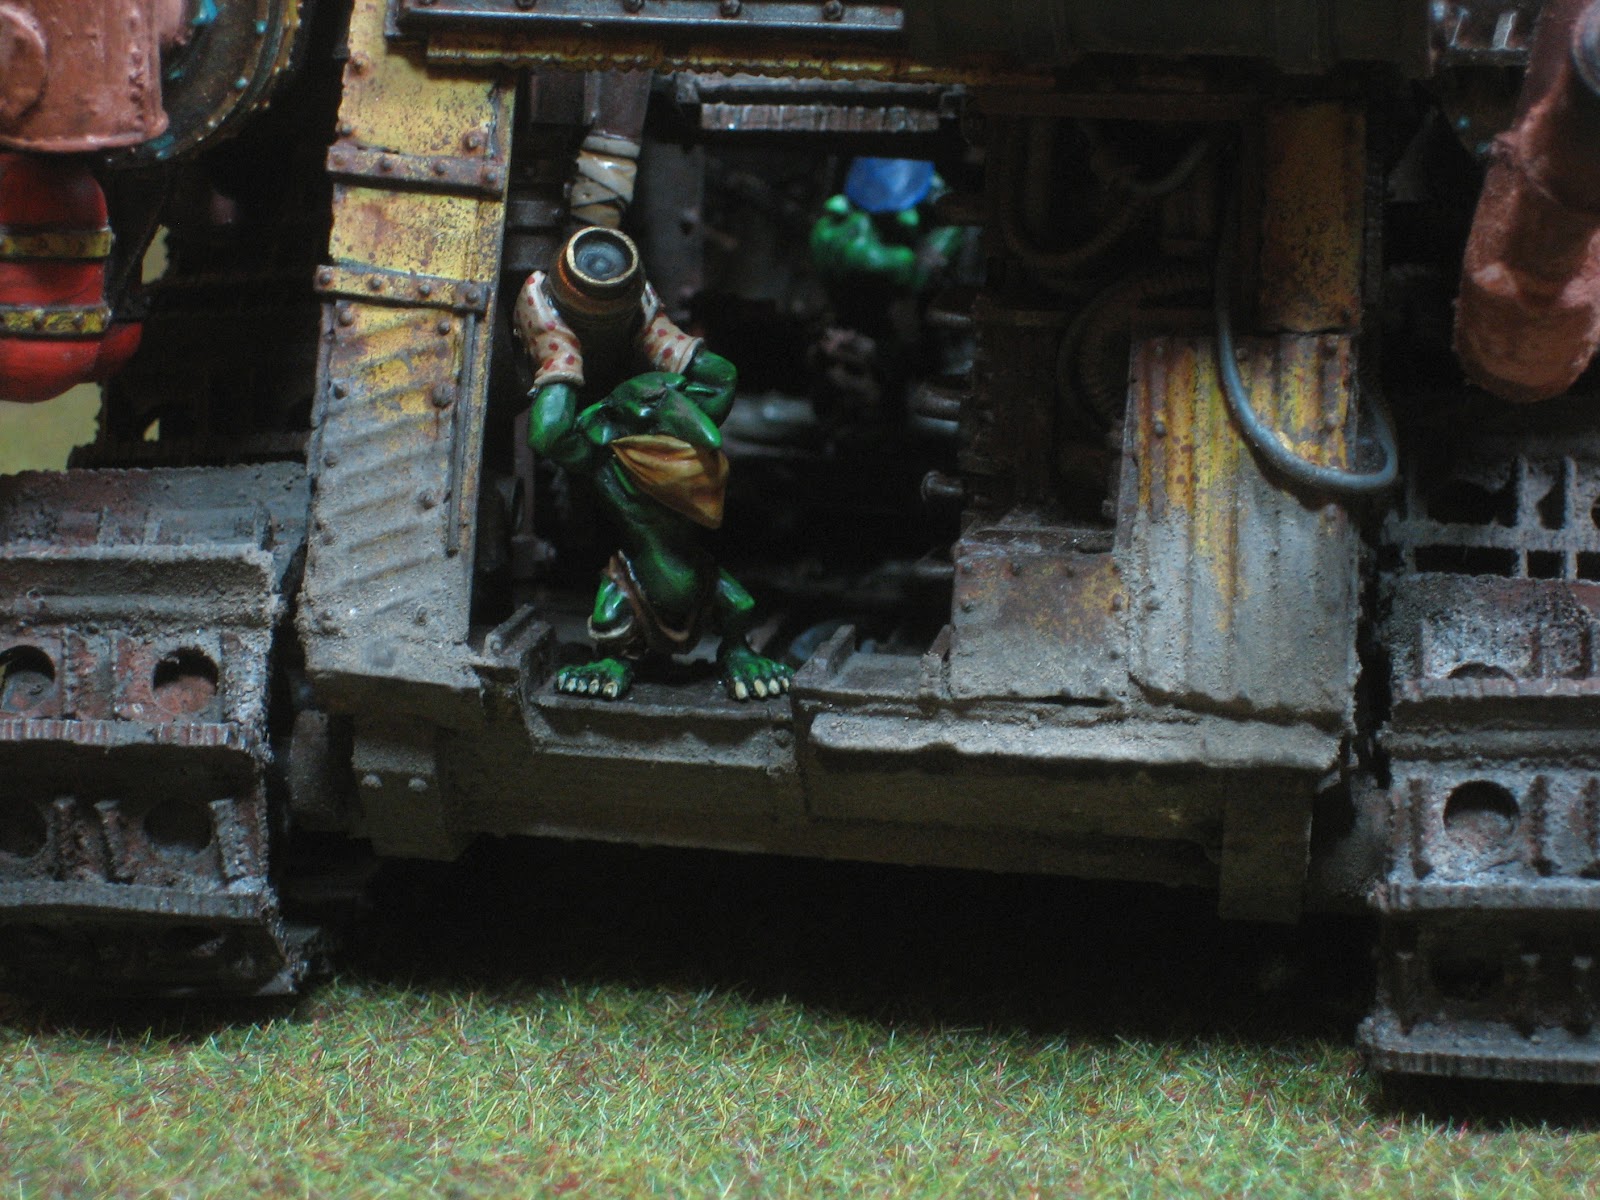
For now, though, our own thoughts. For my part, the thing that always impressed me about Mark's output was his attention to detail. Mostly you'd see this in his conversions, but occasionally you'd see it in his painting too, like these charming oven mitts:
Mittens the Grot disposes of another freshly baked shell casing.
Professionally, Mark was an occupational hygienist. It was his job to figure out which chemicals and processes were safe, and which ones would get people killed. He then applied this niche knowledge to our hobby quite magnificently in this post for those of you who have ever wondered things like "how dangerous is Forgeworld resin? Is it dangerous?"
For me, though, the joy of gaming with Mark lay in the fact that both of us wanted to engage with the hobby the same way. Casually competitive, loads of emergent stories and characters, and laughing so much the game would be put on hold while we doubled up with mirth. When Mark found something funny, really funny, he was just gone. It didn't matter if it was his warpfire thrower dousing his own horde of clanrats, or one of my terminators getting taken out by a grot blasta. He was an equal opportunities gentleman like that.
Maisey
Mark’s hobby prowess was always best shown off during an Apocalypse game. He had such an extensive, creative, and consistent collection. All of us have painted hundreds of miniatures over the years, but Mark had a passion and focus on his Orks that I couldn't help but be utterly envious about. It’s always something that I’ve aspired to, but never could manage.
One of my favourite games against Mark was captured in word format in our post Between a Rok and a Ard Place back in 2012. His Stompa ruined my marine army in short order. The Super-Gatling-Cannon-Thing (I can’t actually remember Ork weapon names) just wouldn’t run out of ammo. THEN to add a hilarious insult to the injury he picked up my Vindicator with the lifty-droppy thing and started throwing it around like a toddler with a toy.
Another wonderfully Mark moment came on the day of the birth of his Daughter. As any imminently expectant father would be, Mark was at our house, gaming. He had challenged himself to try and create an Ork list to try and out-shoot an Eldar army. A wonderfully futile task but he always enjoyed doing that kind of ‘for the hell of it’ fun thing. Now in fairness to both Mark and Emma, neither of them are the speediest of gamers. Playing Mark you knew that you had to make sure you had time to spare and Emma needs at least 2 cups of tea per turn. I had spent the game lounging on the sofa reading and helping out with the odd rule. I think they had made it to turn 3, it might have been turn 2 but judging by the number of holes in the Eldar infantry line, and the number of Ork vehicles that had disappeared under brightlance fire it was most likely turn 3. Anyway, Mark gets a phone call, he looks at who is calling, mumbles that he should actually take this and heads out of the room. He comes back in a minute later saying that Caroline’s water had broken and that he should probably head home. We all spring into action to help pack everything up a quickly as we can and bundle him out the door, sending on his way into the night with wishes of luck. Once he had gone we had discovered that he had forgotten Pigless. We then thought it best to hold Pigless to ransom and staged a rescue mission a few short months later when we finally manage to organise some time.
Some orks Mark painted during the time he allotted for painting something other than orks (full post here)
Andy
It's strange but I struggle to pick any single gaming moment or particular memory to encapsulate Mark and what a joy he was to hobby and game with. What was always so much more evident was how if there was every a person born to play Orks, or Skaven, it was Mark.
His creativity was boundless, which you'd see especially in the ingenious contraptions that made up the heart of his Ork army. An entirely scratch built Chin-Ork (part 1 and part 2); or the way he couldn't just leave his Gork-a-Naut alone (or is it Mork? See them here). Truly there was a Mekanik just bursting to express itself with any plastic he could get hold of. His creativity was infectious too, and I would happily spend hours with him just spitballing ideas for conversions and creations, or hearing about his plans for where his armies were going next (just look at what he achieved with his Skaven).
Far more than that though was what a genuine pleasure Mark was to spend time with. Its rare that you meet someone that you just naturally get on with, and I was blessed that both Mark and I happened to move to Oxford around the same time a little over a decade ago, and that we both shared a passion for pushing little toy soldiers around on a table. It's the greatest part of our hobby, to meet like minded individuals and make friends we wouldn't otherwise make. I'm so thankful Mark was a hobbyist I was able to call a friend, if unfortunately for too short a time.
Living in Cardiff as I do, I got to experience Mark only in short, intense bursts of maximum enthusiasm. His willingness to attempt any scenario, regardless of size, practicality or feasibility always made me smile. His invention and creativity in conversion are the elements of the hobby that I was always amazed by with him. He'd turn up with some bonkers mash up of components that I was always in awe of. I will treasure fond memories of over-loud "WAAAARGH" shouts and of a bumbly kindness that always made him a joy to spend time with.
The others have already showcased some of my favourite Mark posts so I will sign off with a rather Game of Thrones "We Shall Not See His Like Again." I'll miss you Mark.
...and back to Charlie
While I appreciate people don't read hobby blogs in search of the tough end of reality, this post would ring hollow to me if certain things went unsaid. Namely, the cruel timing of his diagnosis, and the heroism of his wife Caroline.
Said diagnosis came at more or less the same time as the birth of Harriet, his second child. Caroline has somehow cared for two young children and cared for him. Others have assisted where able, but the burden on her shoulders has been immense. Mark was quite private about health and emotional stuff, so it says a lot that one of the first times, post-diagnosis, that he broke down in tears in front of me was when he was saying how incredible she'd been.
The worst situations sometimes bring out the best in people, and that's certainly true of her. It would mean a lot to her if anyone reading this could show the solidarity the geek fraternity is known for, and contribute, as previously mentioned, to Andy's Movember effort. It won't bring Mark back, but maybe one day it'll help someone else avoid this sadness.
Mark and I never got around to watching Fury Road. Perhaps on some level I was putting it off; perhaps we both were. It would be a kind of goodbye, and everyone knows goodbyes suck. And then, subtly, things reached a point where the pain medication meant that the days of meaningfully watching a film had passed us by. No amount of subconscious procrastination could keep the inevitable at bay. On the night of the 18th, a message came in from Caroline: he only had hours left.
We sat with him for a while, then he shook me by the hand. "See you around," he said. And I will - every time I see one of his miniatures on a table. They'll ride on, shiny and chrome.
Charlie: Don't be fooled by my name and photo above; this is Mark's final post, as promised in our farewell to him last week (click here for that). Only Mark could've made a post about his own impending death this humorous. It's about the hobby from the perspective of a dying man, and since we're all mortal, this seems relevant to all of us. I'd like to spin this intro out for longer, because I keep feeling like just one more sentence might convey the sense of bewilderment and sadness here at the Beard Bunker, but I already said my piece last week, and this is Mark's post, not mine. Without further ado, here it is.
Mark: This will (hopefully) be the Beard Bunker’s first post from beyond the grave. If you are reading this, I am dead.* Deader than a can of spam. Deader than the moshpit at a Coldplay gig. I imagine that the Beard Bunker personnel will be keen to keep this as the last postmortem post for a while, probably for about 40 years or so.
If you’re interested as to why: I rolled a succession of critical fails on the ‘Don’t Die’ table. These consisted of critical fails for genetics, body awareness, cancer treatment and metastatic cancer spread.
Whilst this post will predominantly be about hobby stuff, there will be a more serious bit at the end about the cancer that got me.
As I approach death, many naysayers and hobby sneerers (you know the sort) might imagine that I’ll have some sort of Damascene conversion, look at my hordes of Orks and think to myself:
In truth, I really don’t think I have. Granted, I’ve spent some glorious sunny days hunched over a desk, in the dark, with two desk lights running whilst I chunk out vehicles, Orks or Gretchin.
But I’ve also wasted days like that, lurking in the pit of my bed with a brutal hangover. Which has been the better use of my time?
I’ve created stuff. It might not be the best painted stuff in the world but it is mine, and no-one else can say that about that model, or story or building. Its mine and the result of my effort, time and concentration, and no-one can take that away.
And as a result of that effort, I have two big, good looking armies that I'm genuinely proud of.
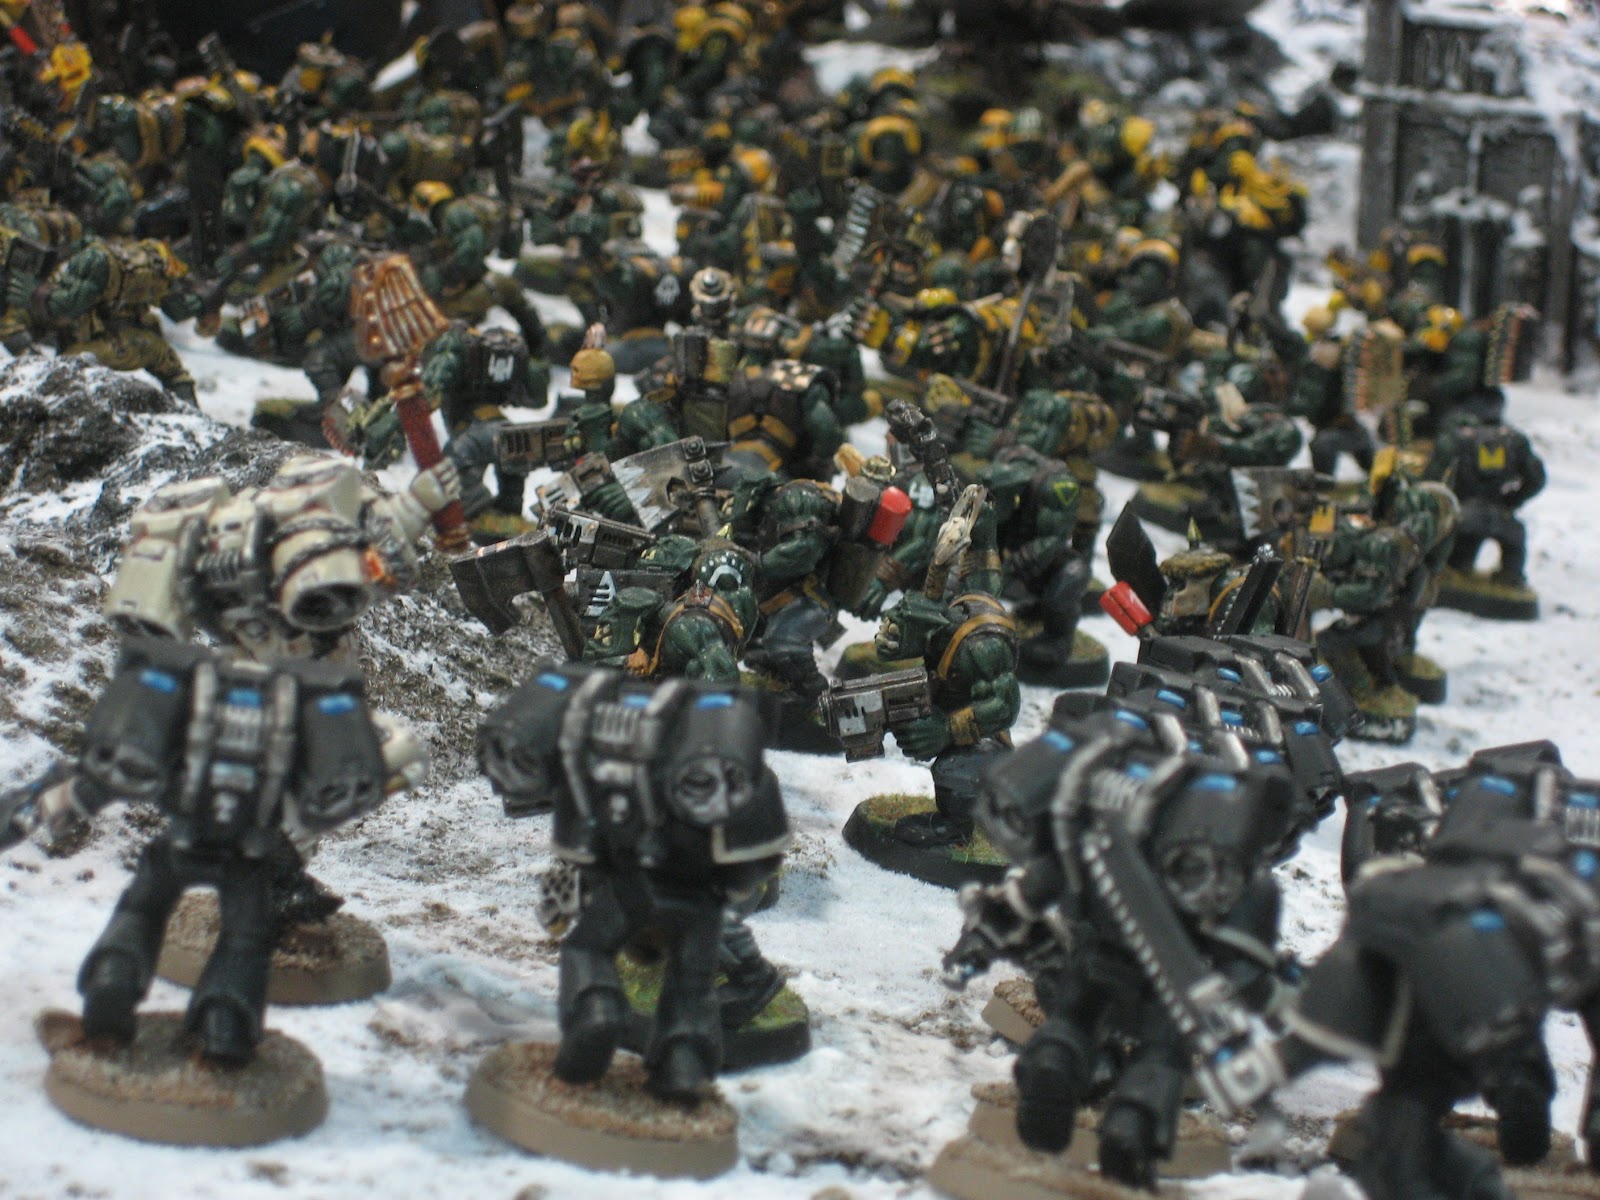
Big Yeller further away. Also, bottom right: da lootie 'fex.
[Editor's note: Mark left instructions for us to post a photo of his entire ork army. No such photo exists, as we're still sorting his stuff, and it's huge. Rest assured that when the dust has settled we'll do a full army showcase of the Crooked Hand Waaaagh! as it deserves to be seen in full.]
More importantly, these armies have enabled me to play a lot of silly games with some very good people, and that’s been the core of my enjoyment with these armies.
A point about our hobby is that, however reclusive or introverted you are, the most fun you’re likely to have with the hobby will be with people - whether that’s playing games, or hanging out painting little plastic men.
And some of the games have been glorious: we had a week long Warhammer campaign with a mixture of grand battles, roleplay and skirmishes in 2013 that I remember fondly. We’ve played several big games at Warhamster World that have looked and felt truly epic. In one instance, Phil Stutckinsas said he liked my Orks, which is an absolutely fantastic complement. And we’ve also played a lot of big Warhammer games back in Oxford - with several filling our 6’ x 4’ table with regiments.
Admittedly, some of my antics have annoyed my friends immensely: Having a doom rocket land in the middle of your elite regiment at 8 in the morning tests your sense of humour somewhat. Apparently. As do Doomwheels, Skaven artillery, Skaven weapon teams. Skaven in general actually.
So no, I haven’t wasted my life. I can stare at the metaphorical approaching meteorite and be a little more at peace than Comic Book Guy. Indeed, as I put together this blog entry - which has taken me more than one sitting - I’m still making scenery, painting Orks and putting together awesome vehicles.
Recently, I finished off two jets for my Ork army which I am genuinely chuffed with. I weathered and finished them with a combination of classic GW style painting, airbrushing and oil paint weathering and I’m happy with the ‘weathered cartoon’ look that the planes have.
Even when hope has been extinguished, and as I approach death; I find that the concentration required to make and paint models and the joy that comes from having completed them helps to make my final days more bearable and distract from the physical and emotional pain of disease and dying.
The victories may be pyrrhic - I’ll hardly use some of these models - but being able to revel in something I’ve created and am happy with gives a satisfaction that beats despair, at least for a while. In that regard, the hobby has been invaluable to me. I genuinely have no idea what I would have done without it at this time.
The building, converting, painting and playing part of the hobby has just been part of the total experience and I’ve also been involved in narrative play, roleplaying and GMing and the occasional boardgame - all of which contributes.
Some (but not all) of Mark's Deffskull vehicles (plus Lootie 'Fex, because yes)
Regrets, I’ve had a few.
I think it's important to say that the hobby life has not left me entirely without regrets.
In hobby terms, there are one or two bigger projects I could or should have completed. My Blasta Bomma in particular I left far too long to gather dust even though it had the potential for true awesome in it. This may be a regret of having my life cut short rather than a hobby one though.
In real life terms, I’ve been a profligate spender - particularly during times when I’ve been unhappy or under stress and I now have an enormous pile of plastic shame that I will never paint and has cost a huge amount of money. In total, I have maybe £3,000 worth of unstarted kits kicking around. My wife now has to dispose of this enormous plastic pile. So I do regret my intemperent hobby purchases immensely because by buying this stuff, I’ve denied other things to both myself and my wife.
The hobby does have to coexist with real life and the hobby is not the sole reason that I’m reasonably happy with how my life has gone. In my time I’ve rowed at a decent level, taught people how to dive and dived myself, had a mildly successful professional career and helped raise a family.
Like the hobby though, these things have been enjoyable in their own right but have become bigger parts of my life than an ‘activity I do’ because of the social and friendship side that has accompanied them.
Certainly, diving on a World War One battleship in the cold waters of Scapa flow was made all the better by doing it with friends who would later go on to be my best man and ushers at my wedding.
So it is with the hobby - playing a game or doing a roleplay session with someone is fun, but having those people be your friends and developing the game, or the universe or characters you play with or just your friendship together makes the whole thing a cause for joy, a sense of belonging and social engagement. Adding this side of the hobby to the satisfaction of the creation and playing process makes it truly great.
With that, I’ll leave you with my thoughts on what makes for a better hobby life. As I’m dead, you can’t argue with me .
A design for Hobby Life?
Is there a design for hobby life? Probably not. But some of the things I’ve learned are:
Spending
Don’t buy more in a month than you can paint in a month. That way the hobby becomes affordable, sensible and psychologically less overbearing. You’ll also need a lot less storage space.
Buy models that you will build or paint imminently. Don’t buy models to ‘cheer yourself up’ or because you’ll get round to it one day. That’s how to spend a huge amount of money. In everything but the very short term, this will not cheer you up.
Money spent on good quality tools is money invested, not spent. A good tool (be it for DIY, hobby stuff, woodworking or cake making will pay for itself multiple times. I spent £70 on a Proxxon rotary tool in 2008 (a lot for me at the time) that I still use today, still works flawlessly and has allowed me to do an awful lot of good work. Similarly, a small aluminium mitre box I bought in 2011 has allowed me to make perpendicular saw cuts on plasticard for years.
Social
Seek out the people who you get on with and whose hobby goals and interests work with yours. Hang out with these people and if you like them, keep them as your friends. Your hobby, your life and your world will improve immensely. For those on the other side of the coin - be inclusive. It’s easy to keep someone out but the rewards are negligible, Bring someone in though and the rewards can be massive - to both you and them.
Play with friends, make friends and bear in mind that the social and friendship side of the hobby is the best and most rewarding part of the hobby.
Be aware of the impact your hobby has on your friends. Smashing face with the latest lopsided, loophole abusing net-list might be fun for you - but is it fun for your opponent? Conversely, is there an aspect of the hobby your friends love? Make sure you do some of that with them.
Don’t rely on the hobby for everything. The hobby needs to be part of a bigger life and you need to get out there and find it. If you aren’t sure how to do that then two starting points are:
Be yourself - don’t try to be anyone else.
Be the best version of yourself that you can be.
Enjoy the hobby and don’t let it be something that limits you.
Getting Stuff Done
Pick your fights. Save the fifth highlighting stage for your Warboss, not your grots.
Don’t get caught in the hype. Pick a project you’re excited about and stick to it. If you keep switching between different things, you’ll never get anything significant done.
Keep chipping away at it. If you do just a little bit (30 - 60 minutes) each day - even if its on a big pile of models - you’ll be surprised how quickly stuff gets done.
Don’t get cancer and die.
And that’s it for now. Well, for ever really. I think the last thing I’ll do is leave with a couple of bits I’ve done over the years that I’ve been particularly happy with - a bit of a character and army showcase.
*Obviously, I wrote this before I died. Bloggers are persistent but usually give up after they die, unlike Tupac.
Appendix - Cancer stuff
I died because of bowel cancer. I probably had bowel cancer for a number of years before it actually did something sufficiently obnoxious (blocked my colon) for me to definitely get my symptoms checked out. By that stage it had metastasised and it was too late for the most effective (i.e. potentially life saving) treatment routes.
However, I had been having symptoms for some time prior to the actual diagnosis which I should have got checked out. It might have saved my life. By ignoring symptoms and failing to seek advice, I killed myself. This was stupid.
Bowel cancer amongst the young (well, under about 70) is rare, but it is on the rise and the reasons why aren’t really understood fully.
Symptoms include:
Persistent change in bowel habits
Blood in stool
Abdominal pain
Night sweats
Persistent or unexplained tiredness
Unexpected weight loss
If you are experiencing any of these symptoms, get them checked out as soon as possible - Don’t put it off as I did.
I have very much skimmed the surface of this topic. There is more information below:
Today I have the unenviable task of writing the first post after Mark's posthumous blog, so I'll open by saying the response to it from the community, both on social media and in our own comments section, has been overwhelming.
It was linked to by all sorts of people, including Aaron Dembski-Bowden and, in a touching move that resulted in one of the Beard Bunker crew quietly sobbing on a bus, the post was featured as one of the Elite Choices in Episode 196 of the Independent Characters podcast. As a long time listener to the ICs, hearing the guys talk about what Mark had to say was a trip, and an affirming one at that. Between that lovely tribute and the many other comments we got, there are two possibilities: one, that it was a funny, informative and moving collection of thoughts, or two, that people love a joke at Coldplay's expense.
Either way, it's given us some comfort. Thanks once again to everyone who dropped by.
We got to thinking about what on Earth one even does to follow that. More talking about our feelings? Heavens no! That level of emotional articulacy would upset the Queen.
I arrived at the conclusion that it'd be nice to provide an overview of the one thing we as a gaming group have all built together, something which has Mark's hobby DNA spliced into it, and which will outlive any one of us: our 40K storyworld, the Achernar Sector.
We are turbo-nerds, and have created what I suspect is an unusual level of detail and publicly available online resources for a group of random grognards. It's constantly expanding and having more detail added to it, and hopefully offers some utility and/or inspiration. We've used it as a setting for 40k, Battlefleet Gothic, Deathwatch, and Inquisitor/Inq28.
My hope is that this post will get you pumped to create your own consistent storyworld, with consequences and emergent history. It can enrich your gaming far more than one might expect... if you're part of a group of regular opponents, of course. If most of your games are against total strangers in a tournament, then this'll be about as much use as a caesium bikini.
A note on our campaign wiki & interactive sector map Many of the links in this article go directly to the wiki Tom set up to help us manage the towering slab of lore we were accruing. Since any of us can log in and add/amend pages, we can collaborate, but the results are much more organised and easy to navigate than attempting something similar with Google Docs. Admittedly were it not for Tom I don't think setting up a wiki would have occurred to us!
Where a relevant wiki page exists, I've provided links in this article. Something that helps to navigate it all more smoothly is the interactive sector map linked on the wiki's front page. Again, all credit to Tom for his technical know-how! He took the map I created and then made every piece of text on it link to the appropriate wiki page. Delicious.
Has your campaign been going on too long? Jeff created the first part of the setting in 2013. One might therefore think we've been playing one campaign for six years, demonstrating the sort of editorial restraint made famous by the Wheel of Time series (all 14 books of it). Not so, fellow nerd. We've been playing a number of smaller campaigns with beginnings, middles, and most importantly, ends. Lengthy campaigns can fizzle out, I find. As such, before I start I say, "Hey folks, I'm thinking of running X, it'll be Y kind of gaming and will run for Z number of sessions. Who's interested?"
Connecting your campaigns There's a big advantage to longer campaigns, particularly in roleplay and narrative wargaming. If people have been playing it for a while, they get to know the setting, and that familiarity enhances immersion and gives the players a better understanding of their options. But it turns out you can have your cake and eat it: run multiple shorter campaigns in the same area of space. Let the events of a campaign influence that area, so the setting accrues history. It starts to feel lived-in. The players' decisions become part of the setting. Everyone in our group has now said, at some point, that they love this aspect of a consistent setting.
It also means that in the rare occasions where multiple campaigns are happening at once, you can have tie-ins. Let's take one of our gaming group, Jon, as an example. I'm currently running a Battlefleet Gothic Achernar campaign for him, and running Inquisitor for the Wednesday gaming group. The Inquisition team had to extract a deep cover agent from a Chaos cult in the Hasmides system. During their debrief of the (now very deranged) agent, they managed to wheedle out of him that the cult he'd joined was only one of many preparing for a full-scale rebellion. When Jon next got back in the admiral's chair, he received a message from the Inquisition warning him to keep an eye on the Hasmides system. Jon has since learned this was actually just the prelude to a full-on invasion by heretic astartes, and is now gearing up for a fleet action.
Since Jon plays the leader of Battlefleet Achernar, we've had him come in to play Vice Admiral Laius Ortano during the 40K campaign on Samalut IX, helping Tom's Raven Guard and Jeff's Blood Angels obtain orbital supremacy to give them more redeployment abilities in the ground war. He's turned up in a few other sessions, such as the Dammerung Conclave when the Inq28 players were planning the capture of a pirate battleship in Boros' Folly.
This is a screengrab from the Google Drawing we used for 2017's Samalut IX campaign. The inverted red triangles indicate ork formations, the blue triangles are friendlies, and individual astartes units all had a unique icon, currently displayed as embarked on their strike cruisers in orbit. Why a Google Drawing? Because each icon is actually a separate image than can be moved around the map by anyone logged in. This allowed the players to assign particular units to different scenarios. Earlier Beard Bunker posts explained the campaign rules, and there were also logs of the event from the perspective of the two players, Jeff (Blood Angels) and Tom (Raven Guard).
Other tie-ins include the Maara campaign. I ran a space exploration campaign for Jon and Andy in which they endeavoured to chart the Scyrian Expanse. Of the various uninhabited worlds they colonised, Maara was best suited to being turned into a Kill Team campaign - a small, frontier town versus the crew of a crashed ork ship who need to loot stuff off them to repair their vessel? Perfect!
Said Kill Team campaign is scheduled to run early next year over the course of a week, and naturally required that I make yet another map...
Room to expand It's important, particularly when there are multiple GMs in your group, that no one person gets a monopoly on adding things to the setting. Tom and Mark have probably added as many locations to Hive Sejanus as I have. Jeff laid down the broad strokes of the Cetus sub-sector, and deliberately left room for others to come in and add stuff. Similarly, I explicitly left room for the Handrothian Cluster and the Kapran sub to have whole star systems added at a later date, which led to Mark adding Pont DuRot for an Inquisitor scenario, and Jeff adding Serpens for a game of Deathwatch.
The Achernar Sector: some broad brush-strokes The sector is a remote one, far from major warzones and right at the edge of the galaxy. One of its sub-sectors, the Scyrian Expanse, remains only half-explored. Xenos goods are smuggled into the Cetus sub-sector from the Halo Zone. Even in this remote, relatively peaceful part of the Imperium, there is still some conflict; the ork invasion of Samalut placed great strain on Imperial forces in the Handrothian Cluster, and the more populous Kapran sub-sector is starting to attract the hungry eyes of traitors and worse.
Culturally, the systems vary enormously. A boisterous Ankran would be frustrated by the staid behaviour of a more civilised Kapran, while someone living in Cetus Major's Hive Sejanus would consider both to be sheltered fools. Even a Sejanus hiver might be envied by a mutant labourer eking out a living in the docks of Erydimae... this being the Imperium, there is almost always someone less fortunate than oneself.
There are no major forge worlds or hive worlds in the sector - it is a backwater after all - and its one hive city (Hive Sejanus) would be considered quaint by Necromundan standards. To the Imperium, Achernar is a sector of little consequence or strategic import. To the trillions of people living in it, however, it is a place of impossible variety in climates, cultures and fortunes.
Designated explosion areas A major risk of collaboratively building something like this is that one person might spend ages creating a really interesting planet, only for someone else to decide "hey I'll use that place for my Adeptus Titanicus campaign!" ...and therefore exploderising it. As such we have a tacit agreement that the Cetus sub-sector is reserved for more domestic Inquisition stories. Furthermore, if someone wants to run something cataclysmic, it's best to pick or invent a system no-one's developed much, and then blow it up to your heart's content. That way the setting gets expanded, and no-one's toys get broken.
Of course, if you're the person who wrote the planet, it's probably OK to do apocalyptic things to it!
In closing I hope this has been useful... or at least, got some hobby juices flowing. If there's something you wish I'd talked about in more depth, let me know in the comments. Equally, I'd be curious to see if you have your own maps and/or setting wikis. Or similar. Quality nerding is, after all, achieved through cross-pollination.
There is a lot that has to happen to push a cult into a revolution. You need weapons, training, leadership, and perhaps most critically, you need intelligence. No, not smarts although that helps, I'm talking the espionage type of Intelligence.
Just as the Primus leads the cult in battle, the Nexos leads it in the planning of the campaign. They are the most gifted analysts in the cult, capable of holding vast amounts of data in their minds and spotting patterns where others see mere chaos.
The Nexos was another of those models that I fell instantly in love with when I saw it. The focal point is clearly that awesome hovering holo-table. This then needed rather more attention than I might give other pieces of machinery! I didn't want to go nuts on the OSL as this is outside after all, but it needed a bit of glow. This was achieved by first drybrushing the display increasingly pale shades of grey until hitting pure white. The I glazed it with a couple of layers of black-green ink. Once dry I started in on adding dozens of scan lines in white over the green to make a grid-like matrix supporting the image before a final glaze. I later used a couple of thin glazes of the same ink on the edges of the finished table to make it look like the light is spilling out. It was fun painting an attack holo of a place I've spent so long in!*
The rest of the painting is unremarkable as I wanted him to blend with the army while having enough pop to be a recognisable character. I used a bit of grey in the final highlights of his skin to age him a little as he has that grizzled look about him. I also decided that the sculpted defacement of the Imperial Aquilla wasn't enough so I crudely painted a big red x over it and then added Stealercult icons to the sides. Running little trails of paint down as though the paint had run helped the graffiti vibe.
So this is my Intelligence Analyst. But who's gathering all this intel for him to analyse? Step forward the Clamavus:
The Clamavus' fluff is very, very, very silly. So I'm ignoring it. Instead he is a communications intercept expert who remixes captured conversations and broadcasts them to give false orders and cause blue-on-blue friendly fire accidents. Better that than... making people's heads explode with alien noise.. moving on. If I'm honest I found the Clamavus a bit underwhelming to paint and frustratingly I notice in the photos some mistakes I'm going to have to go in and fix. To be honest, he's been included for game effect (with his mate the Nexos he can generate command points) so he's not been painted as anything exciting. Of course, it's not just signals intel that the cult needs. Getting actual reconnaissance with the ol' mark one eyeball is very handy too so lets get some scout vehicles all up in our business.
I've always had a soft spot for Sentinels so having an opportunity to include them in the cult was too much to resist. But how would I include them? Renegade PDF troops? Hmm. Bit too simple. What if Ortag Imperial Mineral Exploitation had a division responsible for clearing and maintaining the ground to be Exploited? Thus was Ortag Forestry born and the sentinels with the slightly pointless in-game chainsaws were perfect. A mixture of saws and cleansing burns from their flamethrowers clears ground for strip mining or construction. Their agile construction allowing them to pick their way down steep slopes and among fallen logs with ease. The cult have repurposed them to ape the recon role of their Imperial Guard cousins. Adding captured hunter killer missiles and changing up the mix in the flamethrowers gives a nasty forward operating unit.
As with the Atalan Jackels the principle colour of all my machines will be "House Ortag Red" otherwise known as Vallejo Primer Red. This was liberally applied, shaded with added black and highlighted with a couple of drybrushed layers of the basecoat with a bit of Deck Tan chucked in. I picked out any "caution folks" areas in a nice bright yellow and got the metalwork painted and some sponge chipping where appropriate before launching into a campaign of weathering. This started with liberal oily layers of black/brown ink washes to make a greasy overall tone. This was then followed with drybrushed and washed layers of Baneblade Brown dust on the lower regions of the model. This, combined with some little details like the logo, the gas cylinders being their real world colours, little warning texts and similar combine to make quite satisfying civilian versions of the military vehicle.
I did gloss over one factor in all that painting. The cabs are open on a scout sentinel so you have to paint them in sub-assemblies and assemble after the fact. I wanted the interior to be the Neutral Grey that the rest of the army has on their pressure suits (along with the orange jumpsuits) to tie everything in. But this turned out to be a massive ball-ache as having to do green stuff gap filling half way through painting is... an annoyance. Still. They look good.
And that's all for this session. There's more coming very soon, more purestrains, more abberants and then the home stretch. This project is getting alarmingly close to completed. Exciting! Until then gentle readers,
The Northern Border Princes map: normal style Credit: Charlie/Beard Bunker. Software used: Wonderdraft
Would you like a map campaign supplement for Warhammer Fantasy Battle? Set in the Border Princes? For free? Because that's what's in this post. Of course, you could probably adapt these rules to a different game system with relative ease, so if nothing else it might be a source of ideas for those of you keen to play campaigns in 40K or whatever else.
Our first long-planned foray into the Border Princes coincided with two things. Firstly, it happened to fall on the weekend after Mark's funeral, and thus brought most of our gaming group together for a geekend full of much-needed catharsis. Secondly, and deeply coincidentally, it was the day after Games Workshop announced they were bringing the Old World back in some form. Much as we'd soldiered on despite the death of the Old World, this was a real shot in the arm of our hobby enthusiasm, and we were all overjoyed that whatever form Warhammer: The Old Worldtakes, it's just really great to know G-Dubz acknowledge there's real love out there for Warhammer Fantasy.
Today's post comes in two parts:
An overview of how the campaign works, along with links to the rules, map, faction icons, and the chronicle.
Assorted humorous tales from the first campaign weekend, and the preparation that went into it, including the making of the campaign map.
Part the First: Campaign Resources
For convenience, I'll open with the essential links:
The Northern Border Princes map in campaign mode, with factions starting to claim territory. Credit: Charlie/Beard Bunker. Software used: Wonderdraft & Photoshop
The campaign at a glance This is a map campaign designed for up to 8 players (maybe 10 at a stretch). The campaign is essentially trying to provide some strategic context to you playing some good ol' games of Warhammer Fantasy.
There are consequences to your battles, and those consequences play out on the map without punishing your chances in the next battle. There's no over-ambitious resource management or army movement. It's all about your overall control of the map, and the movements of your forces is kept more abstract so that you can always play a game against whoever's available. When one player attacks another, they choose which enemy territory to assault. It doesn't matter if your territory isn't next to your opponent's - the campaign is designed to facilitate games, not prevent them; it's simply assumed you're going on a long-range raid.
The setting It's located in the uppermost part of the Border Princes, a lawless region south of the Empire, so it's easy to justify the presence of almost any WFB faction (even if you have to MacGuffin something for the Lizardmen... standard). Many of the names on the map were found by researching this area of the Old World, so are compatible with official lore. I've taken some minor liberties with the geography, since it's different on every map I found anyway!
Each faction is trying to achieve a stranglehold on the area so that they can control the fate of the city of Akendorf. Its high walls and decent militia would make a head-on assault impractical, so you must control the surrounding area and cut it off from supplies while growing your own resources (or, you know, protect the city out of the goodness of your heart or something). The players' objective is consequently very simple: whoever controls the most territory at the end of the campaign wins!
Campaign length You decide how long you want the campaign to last when you start; at the Beard Bunker we're going for six months, broken down into a trio of two-month rounds in which everyone fights two battles against each other, or as many games as they can manage within those two months, after which the next round begins.
Claiming territories If you win a battle, you take control points from your enemy's territory, and add them to your own as you walk off with sweet lutes. Strum-te-tum. Both sides, even the winner, can also lose control points if over half their troops are taken out of play during the battle. This makes Pyrrhic draws something of a disaster for everyone!
Many of the territories have special rules that affect the campaign at the strategic level. I've deliberately avoided anything that gives you bonuses in-game, as I didn't want to risk more experienced players stacking silly advantages over newer players (and we have several playing in our campaign!).
Every single territory on the map has an entry in the campaign rules document, with a little background on the area. For wilderness regions this is usually just a single line about the sort of terrain you might find within, but there's more background information (and strategic benefits) when dealing with towns and other areas of note. Some territories offer faction-specific boons, and others are particularly difficult for some races to control (so Wood Elves can't do much with towns, but civilised races can't do much with heavily forested areas).
Renowned Regiments Regiments that survive particularly gruelling battles (any that go on for at least 5 turns) can gain random veteran abilities, which can subsequently be lost if they take 75% casualties in later games. These abilities are generally fairly mild, and are mostly just there to help add extra flavour.
Allies & diplomacy There are also straightforward rules for allies and diplomacy, since it's perfectly feasible that some factions make natural friends. This allows for team games, as well as more strategic things like loaning control points to your friends... and trusting them to repay you...
Faction rules Each faction (at least, the ones I knew were taking part and a few more besides) have special objectives that encourage them to act in a thematic way on the map. If they can manage to make these objectives occur, they gain major bonuses on the map. If undead factions, for example, manage to claim all the gloomiest grave-filled territories, they can instigate a zombie apocalypse grand ritual that drops control points off everyone else's territories as their troops spend all their time battling waves of undead! By contrast, the Empire and Dwarf factions gain boons if they manage to get joint control of the Old Dwarf Road connecting Karaz-a-Karak to the Empire, because y'all know trade is important.
Again, all of these things happen at a strategic level to prevent one player becoming tediously unstoppable on the tabletop.
Interactive maps & tools for autonomous players I wanted the players to be able to play games when I wasn't around to update the map. The solution? Give all the players write access to a Google Drawing with the map set as the background, and little individual faction icons that they could move about on the campaign map. Whilst I was at it, I also produced a Google Doc called the Chronicle, where people could record the happenings of their games for the amusement of other players. Finally, I created a Google Doc called regiments of Renown where people could record their unit veterancy. All very simple stuff, but it meant that once the campaign began I didn't have to do any bookkeeping at all.
Of course early on it's worth checking in on the players to make sure they're doing the pre- and post-game sequence correctly, particularly if they're the sort of person to not read things very thoroughly and just sort of flange stuff in a way that breaks the mechanics. Giving your players this much autonomy will test your cat herding skills early on, but makes it very easy once they're in the swing of it. And they got very in the swing of it, as part two will show...
Part the Second: how did the first weekend go?
The first thing to do was prepare. In addition to writing the rules, this meant producing a suitable map (oh well if I must). Also some extra scenery. Oh, and also the small matter of getting a bunch of my goblins based (if you're going to run and play in an adversarial campaign, then for the gods' sake, play the comedy relief. That way you can't be accused of cheating).
Maps & faction icons Some research and experimentation taught me that there are several map-making software packages out there, and the one that suited me best was Wondercraft. It's not free, in fact it's $30, but it's a one-time payment rather than a subscription, and it's hella flexible, and waaaaaay faster than getting the same result in Photoshop/Illustrator/Dreamflange. It took a little time to learn, but was overall pretty intuitive, and most importantly can overlay things like hex grids as standard. As such, I started off with the grid and then drew in all the terrain features so that everything lined up nicely.
You could probably use Wondercraft to make sci-fi maps, but it seems happiest making fantasy maps given its extensive library of pre-drawn icons. If I ever try doing sci-fi stuff with it I'll be sure to upload it here.
The only thing I did in Photoshop for this map was placing the ring icons to indicate empty control slots. I digitally painted the ring, then copied and pasted my way to victory.
The campaign map prior to the first campaign round. Credit: Charlie/Beard Bunker. Software used: Wonderdraft
The faction icons I made myself purely in Photoshop. You can access a Google Drive folder containing the ones I made here, along with a copy of the Photoshop file, so if you have Photoshop (or something that reads .PSD files) then you can have a crack at making icons for other factions to stick on this map.
When you've finished working on your icon, save it as a .PNG file, since unlike .JPG, PNGs support transparency - allowing you to have a round icon rather than a square one!
The faction icons for our 8 players. Note I tried to have both distinct shapes and distinct colours, so even when small, the icons are easy to distinguish on the map. Credit: Charlie/Beard Bunker. Software used: Photoshop
Of course it's no use making a map if people can't get at it while they're playing, or inevitably people will fail to update it and everything will become leaky and covered in bees. As such I ensured there was a table to the side of the gaming area set up with my doddery old laptop hooked up to a nice big screen and a proper mouse, because ain't nobody got time for using a touchpad to deal with a Google Drawing.
Reinforcements! We all have armies, but inevitably the anticipation resulted in new things being produced. Andy and I both went on basing sprees, and Jeff in particular went on a bit of a painting bender, and even painted an angry stunty on a slab of green marble.
Harvey gets the main biscuit here, though, painting as he did an entire 2k army of Chaos Warriors. More on that another time, because it deserves a post on its own. He spent most of the run-up, and almost the entirety of the event, shouting "VIKING DEATH" at anyone who challenged him. And anyone who didn't challenge him. And a passing seagull. And my fridge.
Scenery Before he kicked the bucket with memorable vigour, Mark covered some of my finished scenery in plaster and sand. Deliberately. All I needed to do was paint it, which I did... the night before the campaign was due to start.
Mercifully, after I spent ages figuring out a crazy cocktail of about four different types of static grass and various types of tufts (seriously it was one of the last things Mark did and I really really wanted to do it justice, shut up, I'm not crying, you're crying) ...and breathe... Jeff and Andy were on hand to get the other two hills done in a fraction of the time I did the first one. Andy's static grass cherry was thus gloriously popped (I know... what?! He's been into this as long as me, but never before had the man grassed).
Here's a shot of a hill in the previous style, and next to it, a hill in the new style. See if you can spot the difference:
With that final spurt of scenery complete, I sat back and waited for the carnage to begin.
Tales from the weekend If you want to read a variety of comedic and/or glorious recollections of battles fought and lost, head over to the Chronicle. Here are some highlights:
The Battle of the Southeastern Düsterwald The Black Hands (Harvey) versus the Blue Moons (Charlie)
Game over in two turns following both mangler squigs self destructing in turn 1, and the spear chukkas exploding by turn 2. Also both line units ran off the table after failing all their leadership checks due to said units self-destructing next to them. The Norscans did almost nothing.
The Blue Moons attempted to navigate their way to Silkwood but got lost, found some Norscans in the woods, and aggressively exploded at them to demonstrate who is bestest, then left, quite happy that they’d intimidated them with their ritualistic army-wide haka.
The Battle of Neubrücke Blackhands (Harvey) versus The Stormborne Host (Jeff)
As Aldebard Kragmantle - warden of Kazad Urkbavak - was patrolling the Old Dwarf Road at Neubrücke, he was fallen upon by raiding parties of the Blackhands led by Talos Frostbane. Underestimating the barbarian Northmen, Aldebard turned to face and drew up his battle lines.
His ego writing promissory notes that his well armoured rear simply could not honour, Aldebard stepped forward to face the champion of the Knights and after a lengthy duel fell, grievously wounded. Under the relentless barrage of Talos’ magic and the vicious steel of the warriors the Dwarfs accrued far, far too many casualties and self preservation overcame stubbornness. As they fled they were cut down by blood crazed warriors and chalked up the first defeat of their campaigning season.
An honourable mention must be made of a single, nameless organ gun crewman who held up an entire regiment of Marauders for 3 combat rounds.
The Battle for The South Geistenmund Hills Druchii (Dan) versus The Moonlit Barony (Drew)
Whilst summoning the legions of the spent to their rightful master, Baron Ferdinand Engelbrecht Moritz Rosengart III was set upon by a mysterious dark elf sorceress and her forces.
Righteously indignant at the gall of this peasant hussy, Ferdinand immediately advanced on his foes. The elves held their ground and began to fire, completely destroying the unit of raised servants Ferdinand had gloriously situated himself in.
He pressed on, charging the filthy intruders and terrifying a unit of archers into submission (their natural place) before pursuing with The Bloody Spavs and ripping them apart.
The elves held their nerve with that naive bravery found only in flesh bags, but ultimately scattered to the howling winds of the night from whence they came.
The Battle of Gargant’s Run
Onefinger Tribe (Maisey) versus The Blue Moons (Charlie)
Wee woz explorin the place norf of Little Squighorn coz we heard from local gobbos dere might be giants innit. We saw sum big'uns, so we sent da Deadwebs off to 'ave a look. When dey came back dey said “dey might be giants.”
Dey wozn’t giants. Dey was da zoggin ogres from up Norf! We squigged ’em good and went home for soup.
After the mangler squigs happened. Note, the leadbelchers are fleeing through the ironguts, and have just caused them to break. Burping Rhone's unit of bulls is just... not there any more. Since both armies were painted by Maisey I figure his army still won.
Particular mention must be made of the diary kept by Maisey's ogre tribe. Here's a few entries:
The Battle of Styratia (Probably) Onefinger Tribe (Maisey) versus The Avernal Glade (Andy)
Nargutt’s Diary day summthin'. We came, we saw, Burping Rhone Burped. 'E burped all over da little pixies. Deaf Mungo went boom, so did mor pixies. Pixies run off. Left roast venison for us. Good eating, would eat again.
The Battle of North Starnek Grasslands The Onefinger Tribe (Maisey) versus Erui Naneth (Emma)
Da treez shot at da ladz. We shot the trees back. Then da tree started moving. So we burnt down da treez. Then it got all quiet again. Da tree woz not tasty. Would eat again.
The Northern Border Princes: campaign map, as of today. Credit: me! Software used: Wonderdraft
By contrast, Harvey's purveyors of VIKING DEATH made a good account of themselves on the battlefield but were initially hampered by choosing to start in an area of cursed forest more suited to other races. As such they are spread wide but thin, and only took their first town towards the end of the weekend - in the opposite corner of the map!
The winners of the 2019 Campaign Hobo award is Dan, whose Dark Elves were the first (and currently only) faction to lose all their territory thanks to a combination of cursed dice and extremely cursed dice. Spare Dan a thought. As ever, he was an absolute gent about the situation and is cracking on with painting more angry pixies to take bloody revenge on us.
Somehow, my goblins actually won a battle... twice! Admittedly they also produced my fastest defeat ever and were generally a source of absolute lower-case chaos. Bloody marvellous.
I hope you've found this entertaining, and I equally hope someone out there has a crack at playing this with their group. We've had a cracking time so far. Any questions or issues with the rules, or anything else? Yeah? Throw a comment right up in our business.
Today on the Bunker: hills. The rocks. The rolling grassers. The loomy craggers. The swole risers. As mentioned in my last post on our new Fantasy campaign, one of Mark's last gifts to the Beard Bunker was to enhance our tattered old rocky outcrops. I had a lot of ground to cover in that post, so couldn't really go into it there, but since rocky outcrops are universally useful scenery I thought I'd expand on how these hills were made.
Whilst Andy, Jeff and I did the painting and grasses, Mark did the build. Or... the rebuild, taking some of my old and busted terrain as a starting point and literally building on top of it. He used the method and materials discussed in this video from Luke's APS, and the difference was... pronounced.
Original style on the left, new hotness on the right. If you couldn't tell.
The video link above is the best place to see how these things are built, but the basics are this: Mark used the rock moulds from Luke's APS and poured in the compound/plaster he sells. Once he'd made up a few batches of the stuff, he then took my old hills and stuck the plaster rocks over the top as cladding. He then used the compound mentioned in the video to smooth in the joins and the shape of the earthen areas before then applying sand, grit, etc, to add texture as appropriate. Mark did use the method suggested by Luke's APS to paint it, as the bare plaster takes on the colour of washes well, although the finished result looked more like a stone than a cliff face. It might've worked better if Mark had gone with the rock strata to band the colours, but the finished result didn't really look quite right or, indeed, fit in with any of the other rocks in the scenery we have. Arse bangles, we thought.
Cut to a month or two later, and I end up painting it again, with emulsion paint this time. I had to do a rather rushed paint job against a deadline, so the rocks are very basic. It'd be nice to go back and add more colours and detail if I get a chance.
Having painted them, I got a bit over-excited about MANY FLAVOURS OF GRASS. Except the Class B kind; das ist verboten.
The hiiiiills are aliiiiiive, With the sound of laaaaasguuuuns, Pewwww pew pew pew!
Grassing yo bumps
Come the flocking, the first thing to do was to assemble a fine array of grassy goodness: three flavours of tufts, and four flavours of static grass of varying length and colour. This would help make things look more natural, and once you've figured out your recipe, is surprisingly quick to do (though obviously still slower than just doing one colour).
It used to bring me quiet joy to stand in a high street store and sell adults and kids poly bags clearly labelled 'grass/herbe'. One can only imagine the appalling smell and lung damage if some numpty actually tried to smoke this stuff.
The method is simple: cover a section of your hill/terrain piece with PVA (white glue) then take a pinch of grass and sprinkle it on in random patches. Then take a pinch of the next type of grass and do the same, slowly building up different areas of colour. Leave occasional bare patches you can attach tufts to later.
Once you've gone through your various shades, you come to the final shade: your primary grass colour (i.e. the one you used for your board, if you have one). Cover any remaining areas with this final colour. Use a sieve if it's a big area. With everything now fully covered with grass, tap off the excess and stick that back in the tub (it'll be almost entirely the final colour, since the rest should have been applied more thinly and therefore won't have any excess to fall off, so don't worry about contaminating your main tub colour).
You'll note I said to cover a section with PVA, not the whole thing. That's because you don't have long before the surface of the PVA starts drying, and it won't retain as much grass. Do a discreet section, finish it, then move on to the next one.
With your grass applied, give it a quick blow to help it stand up a little. Try not to immediately inhale a lungful of static grass. Honestly the blowing is optional (in this context, at least).
Next up, get yo tuft on. I used to apply tufts with PVA/white glue, but found the long curing time of PVA meant you ended up with tufts hovering off the ground and other nonsense. This time I used superglue/CA glue. I was worried about getting white vapour on the surrounding area, but actually that didn't happen, and it worked much better than PVA. Go figure.
Cave entrance for added scenario utility. I left bare earth showing around the entrance to indicate frequent use.
That's pretty much it. The painting could be a bunch more detailed and less monotone, but otherwise I think these came out well, and have also given me a roadmap for basing my Imperial soup army.
Easy, quick, delicious.
Many thanks to Jeff and Andy for being my sweatshop minions; we grassed one outcrop each, and honestly, doing scenery as a team is the way to get it done. Most of the tasks are very simple, many hands made light work, and we all benefited from having more terrain in the slaughter-filled geekend that followed.
On a final (dangerously sentimental) note, I want to thank Mark. He knew he was never going to get to game on these hills; he was barely well enough to build them. But he knew we'd be using them for years, and said he liked the idea of leaving something useful behind for us to enjoy.
Plus, he got to make a big plastery mess in my gaming room, and who doesn't love making a mess?
We have seen many aspects of the Genestealer Cult. The willing acolytes, the hideous xenomorphs, the cunning leaders. But one aspect has been left a little isolated 'till now, the Atalan Jackals were kinda on their own. Mercifully, no longer:
The Atalan Ridgerunners are high-speed (seriously, 14" a turn, they keep up with the scrambler bikes) exploration vehicles. They're built to take the worst that the badlands of the 41st millennium has to offer and dish it back too. From a pair of bandit-dissuading heavy stubbers to a nasty mining laser (you can have flamer or mortar but, well, lasers...) they have teeth enough to discourage most idle threats. In game they are a great option for hooning around the table getting those mining lasers into range of the enemy's armour.
Following the colour palette established in the sentinels I did most of the painting in the Ortag red I've used on all the other equipment. It's a quick process, basecoat in Vallejo primer red, add some black to the mix, thin it and run it into the recesses to give a shading. Then drybrush with a couple of goes of Primer Red mixed with Deck Tan. Yellow areas denote safety considerations - railings, towing eyes, ladders, hand-trapping laser mountings. Safety matters folks and House Ortag and it's Mineral Exploitation division care about you.
I then added a bunch of decals from some random sheets I had lying around. Scale model kits are goldmines for little sections of text or warning labels. Then started in with the heavy chipping and weathering. An armoured dune buggy moving as fast as a scrambler bike over rough terrain is going to take some serious knocks. Sponge chipping, kept to the areas that would impact the ground on rough landings, gave me the wear. Then a ton of drybrushing and washing with Baneblade Brown gave the kicked-up dust that a vehicle like this would be covered with.
Not wanting to limit myself in options, I made the spotter/surveyor arrays as drop-in choices so I can go for whatever works best for that battle. I'm not totally sold on the flare launcher so I didn't bother with that option. These were a ton of fun to paint. Coming up with little details like the square Ortag Imperial Mineral Exploitation logo and all the warning labels was a blast. Really looking forward to the Goliaths now.
If that wasn't enough support, the Jackals also now have a leader. The Jackal Alphus is an odd HQ choice, a fast-moving; bike-mounted sniper. In real life that makes some sense as getting to position fast is nice, but in game it's problematic. So why do I have one other than because she's freakin' cool? Because in addition to being a sniper, she helps her Jackal brethren by adding 1 to hit rolls when they stay within 12" of her. So those mining lasers on the quads now hit on 3's...
Painting-wise, there's not a lot to talk about. She is painted the same as the basic Jackals but with some more highlighting. Really loves all the little details on this model. The bolt action rifle is gorgeous. The weight distribution where she's holding the bike while she aims is cracking. Lots of fun.
Speaking as I was of random decals. A dial for a WW2 kit came in really handy on this kit as it was exactly the right size for the controls on her bike. What are the odds right?
That's all for today folks, there's Patriach's and purestrains on my painting table and then we're really on the home stretch. Two characters and three vehicles and this project is finished. I'm well excited 😀
In today's post I'm going to talk about how I weathered my newly-painted primaris aggressors, and why I think people paint astartes' boots wrong (the hot take the internet's been waiting for, I'm sure you'll agree).
But first, a rant.
The primaris answer to the venerable terminator is simultaneously exactly what you want terminators to be on the tabletop, and deeply silly on the visual front. Decades of Stockholm Syndrome have allowed me to almost forget how preposterous power fists are as a weapon design, but to double down by attaching bolters (a famously temperamental weapon) to a melee weapon (i.e. something that's got to take some punishment) and then attaching massive ammo feeds to it (definitely going to get broken in close combat) is basically an invitation for aggressors' wargear to break about five seconds into their first close encounter with the enemy.
At this point you're probably thinking it's weird of me to put time into painting models I think are silly, and I can explain, BUT FIRST, why do they have solid blingwangs swinging between their legs? Those are 100% going to get in the way. At least a cloth tabard has no volume! If I liked these models more I would have done the codpiece sculpting needed to remove them. Oh and also they have disco heels. Sure. Why not? When disco power-heels are the least silly of the silly things, you know you've achieved greatness.
Despite these quibbles, they've still ended up in my collection. Why?
They came in the Imperial Fist battleforce box I bought last Christmas, and I really wanted everything else in that box.
They kick out so many shots in the game that I'd be silly not to use them if I already own them.
They were a chance to further refine my paint scheme without being too worried about making mistakes.
Like so many models before them, these guys did grow on me as I painted them, and thus have I gone from active disdain to shrugging indifference. It does feel great to have scratched them off the to-do list, as I absolutely love the other minis waiting in the queue, and have already made inroads into my converted captain. So... I guess the rant is over. On to the constructive points.
As pretentious as it is for me to say the GW studio paint their own minis wrong... pff screw it I might as well lean into this.
The visual language of a space marine is a mixture of rigid armour plates and bendy rubber bits connecting them. People therefore paint the seals between the plates as rubber. The soles of the boots are also bendy, but people always paint the soles of the boots as armour colour, so the brain says "that's solid metal" even though they can't be. Now obviously one can colour rubber, so technically that's fine, but it helps someone parse the information if different materials on a miniature are painted in consistent colours so you can understand the thing you're looking at.
Consequently I've been painting all my primaris marines with rubberised soles, and in the case of the aggressors this really helped take the edge off their hilarious disco heels. The irony, of course, is that after basing and weathering you can barely see the difference. My commitment to irony knows no bounds.
Refining the colour scheme
Since my initial post showcasing the first five intercessors, where I went through all the colours I'm using, there have been a few changes. When I finish the army I'll do a full updated step-by-step, but I'll record discoveries/refinements along the way.
First up, while listening to an episode of the Independent Characters, regular show host Jody mentioned the liner paints by Reaper, formulated specifically for lining in panels etc. They come in three colours: brown, grey, and blue. Since I was at the time having some trouble with Nuln Oil going fuzzy and white for no obvious reason, I decided to give them a go. They are perfect for the their intended purpose! A matte finish, thin enough to naturally sink into the crevices, but waaay too thick/strong to use as a shade without dilution. They're definitely in a niche, but they fill it well. Boom, and more importantly, tish.
Secondly, I've added a dot highlight stage to the red, as it made no sense to only do that for the blue.
Finally, I'm going to try doing the shoulder pads with Corax white (i.e. an off-white) rather than pure white, so that I can apply highlights (which will also enable me to use the weathering discussed below).
Ways to guarantee I get lots of angry comments include using both male and female heads in this army. Anyone else wishing to troll those who feel the whole concept of space marines is magically ruined by the addition of a second X chromosome can order some Techno Roider heads from Statuesque. As a further side-note, the skin tone was achieved with a basecoat of Vallejo burnt umber, highlighted with Vallejo beige brown, thanks to Jeff's excellent advice in his post on his Orlocks.
Weathering
The big thing I decided to experiment on with these guys was adding weathering to my colour scheme for the Cobalt Scions. There's always something bracing about doing six stages of blue and then throwing some weathering for the first time, when you're not sure if you'll like the result.
The technique is simple enough: paint your mid-highlight tone (Calgar Blue in my case) in random dabs, then go back over with your shade tone (Reaper's Blue Liner in this instance) just above the marks you made. This has the effect of making the dents appear 3D, assuming the light source is from above. Obviously if you wanted the light source to be coming from another direction for some reason, adjust accordingly. Darren Latham has a good video on painting this style of weathering.
The other kind of weathering I added was some Typhus Corrosion to muddy-up the boots, helping bed them into the moorland bases I'm giving to all my Imperial armies (so I can make some delicious Imperial Soup, with the marines acting as the croutons).
Here's a quick step by step on the mud:
Paint an area (e.g. a boot) with a thin skim of water. Apply the water over a wider area than the area you intend to muddy-up.
Quickly apply a fairly generous layer of Typhus Corrosion inside the watery area before it dries. Avoid getting any paint on dry areas, as it'll prevent you doing step 3 properly.
Take a wet, clean brush, and use it to feather, blend, and thin the Typhus Corrosion so that the colour beneath comes through. Thanks to the water you painted on in step 1, this should be easy enough.
It's important to work quickly, as the water and the paint will both dry fast. It's therefore best to do one area (e.g. a foot) at a time. The aggressors' boots are so big that I actually did the front and back separately to make sure I had enough time to work the paint.
I'm happy with the results, so now I'll have to go back and apply it to the intercessors I already painted. Here's the clean and weathered squads side by side:
It's a subtle difference, as I didn't want to go overboard, but I think the weathering helps bring them to life a little. Next up is the captain, so I can actually get them on the table as a patrol detachment, so I'm really glad I took the time to experiment on the aggressors before moving on to him!
What's the total power level? Let us know in the comments to win an imaginary grot. Photo credit: Boris Altemeyer
Today's post is something special. It's the first of a three-part blog showcasing Mark's preposterous ork army: the Crooked Hand Waaaagh!
In case you haven't read Mark's posthumous post, or our thoughts on his loss, Mark was a member of our gaming group who was taken from us and his young family by cancer at the age of 37. He died in October, so the fact that this post is only just coming out now should say something about the logistical and technical challenges we faced, but hopefully we've done it justice.
His ork army was his pride and joy. It's filled with a dizzying array of conversions, and approximately three metric tonnes of weathering powder. There are so many things to go through that we could never have done it all in one post, so instead we're doing three:
Today's post: the Bad Moons, plus a photo of the whole army filling a table (see above).
Next week: Snakebites, Evil Sunz, Blood Axes, and the making of the showcase.
Two weeks from now: the Deathskullz. Looters, wrecking crews and walkers abound.
Tufflukk's Bad Moons
This is where Mark's ork collection started, but even in his last months he was still adding new models to this section of the army. Here they are:
The fact that in this photo the Bad Moons are comfortably occupying the same twelve square feet as seen in the big photo above tells you how hard we had to cram everything in. Even if you only count the bog standard ork boyz in this photo, there are 90 of them. Then there's tankbustas, nobs, freebooters... one or two vehicles... Photo credit: Boris Altemeyer
By now you'll have noticed the photo credits. That's because Mark's photographer friend Boris came down from Milton Keynes with serious photography gear to help with the group shots. These are much harder to take than photos of single squads, and I'll talk a little more about the great work Boris did in next week's post (when we don't have quite as many units to get through!).
The whole concept of this showcase is to leave no finished* unit behind. As such, here are 41** photos of the richest orks in the Crooked Hand Waaagh!
Here's Gzag, painted so recently that he's never been used in a game. I'm not sure how much you can tell from this and the photo above, but I think Mark's painting came along a fair way over the decade, even if it was solid to begin with.
Having his deff dreads running at full tilt like this made them way more intimidating when I saw them coming at my dudes from the other side of the table. It also made them A BIT FRAGILE.
Kustom dragsta. There's a lot of conversion going on here, but among things that are hard to photograph include the nitrous injector (the orange thing just visible in the cab) and a couple of stikkbombs strewn about the floor of the cab in case the driver wants extra party favours.
The Dorkanaut. There's a fair bit of conversion here. I really like how this kit looks with tracks instead of legs. Also, look at how concrete-y the concrete is. A weird thing to love, I admit. Don't judge me.
Another charming detail... see the little exhaust near the bottom? That's actually a light switch that connects to a battery and LEDs in the eyes. Sadly the electronics are fried nowadays.
Phew. Quite the photo-dump. I hope that's been edifying, inspirational, and amusing. If it wasn't, then TUFFLUKK. Now, if you want to see a Kill Bursta painted in battleship disruption camo, or Sergeant Nibbles the squig showing off his beret, we'll be back next week with Part 2.
This week's focus: da uvver wunz. Some light Photoshoppage was done so you can see through the rotors on the koptas to make it easier to see what's what. Image credit: Boris Altemeyer.
Today we have the second part of our showcase of Mark's massive ork army (catch part one's Bad Moons here). We've got moar konversions to share, plus also some comedy notes on the making of at the end. This penultimate episode could reasonably be titled "da uvver ladz," since as the above group shot indicates, it covers the smaller factions that Mark dabbled in.
I say dabbled... he embarked upon a full army of Blood Axes. It has some amazing kustom vehicles, most of which he didn't finish. In the cabinet* in which his armies are kept there is an entire shelf of 80% finished models. That Mark was an itinerant dabbler in many concurrent projects wasn't news to me, but I had no idea how deep the rabbit hole went. All the projects within a stone's throw of completion have made it to the cabinet, such that we might one day help them over the finish line.
Behold the shelf of many almost-finished vehicles!
We made a point of keeping unfinished things out of this showcase, though. As amazing as the kustom artillery, trukks, boyz, blasta-bommer and kommandos might be, they will for now have to serve as a cautionary tale to the rest of us: finish your stuff, or leave your nearest and dearest with absolutely no idea what to do with your WIP cairn.
And now for some kultural tokenism: the Snakebites, Evil Sunz and Goffs are represented in Mark's collection by only a single unit each. As an Evil Sunz player myself I do of course find that completely preposterous, as Evil Sunz is clearly da best. The Goffs (at least, I think they're Goffs, but they might just be miscellaneous orks...) are your classic mob of 30 lads, and the Evil Sunz are your classic biker gang. The Snakebites, however...
Here we have 5 converted boar boys, and an ork called Pigless. Many have asked what happened to Pigless' mount, but the other boar boyz just mutter that it weren't natural what he done to that pig, and won't be pressed on the matter.
These are pretty early paint jobs, as are the bikes, which becomes even more evident if you compare them to some of the other lads in this post.
With those light entrées out of the way, let's talk Blood Axe. In usual orky fashion, these Blood Axes have understood the value of having camo, just not the importance of having consistent camo.
Believe it or not, this is based on a real RAF camo scheme. Mark's original post on converting the chinork is here, and his post on the painting and camo scheme is here.
It takes a special kind of enthusiasm to have a model as big as this with only one foot on the ground, but it does give it a greatly enhanced sense of movement.
OK we need to talk about these gretchin. FUBAR is just a lowly grot oiler who has yet to pass any of his workplace competencies. Grotface, on the other hand, is... wait for it... a roleplay character.
I can explain.
The first RPG Mark ever ran was set in Orktown. Most of the players were orks trying to find their stolen trukk. Tom, however, played whichever unlucky gretchin the orks had most recently collared. Given the astonishing rate of attrition, the ork players just referred to Tom's current gretchin as Grotface. If memory serves, Tom was playing Grotface the Third by the end of the first session. I forget which Grotface ended up wearing a bucket, but he was the bestest Grotface, and spawned many romantic novels (most infamously The Grot in the Iron Bucket by renowned Weirdboy Volt Hair).
If the klaw has dazzle camo, you can't see it coming. Fact.
Major Ordnance and Sergeant Nibbles: one boss and his squig, herding his tribe to the promised scrap. Brings a tear to me eye, it does. Actually it kind of does, since this warboss conversion was actually something I did some work on. Mark was an absolute boss at converting mechanical parts, far above and beyond anything I can do, but didn't have much experience with sculpting, so asked me to sculpt kunnin' hats for da Major and his pet.
When you really look at them, peaked caps are quite complex shapes, and I felt like I might have over-promised. At the least, I was expecting to have to do it in several sittings to stop things squidging or sliding around. Surprisingly, though, it went on in one hit. Before the primer went on, the boss looked like an orky Luigi.
The group shots, how they was done, and who done 'em
Taking pictures of an individual unit is easy: stick it on a curved bit of paper, point a decent amount of light at it, and take a picture. Do some cropping, white balancing and resizing in Photoshop, and boom, that's it.
Decent shots of a whole army? Sweet baby Jesus on a little squeaky tricycle. It's too dark, or it's too blurry, or more commonly both. It's doable but I'm often disappointed with the results compared to the shots I can get of individual minis.
So, I knew I wanted to do a good showcase of Mark's orks, but had no idea how I'd get a shot of the whole army. Then, at Mark's wake, a stranger approached. "Are you Charlie?" the stranger asked.
"Yes?" I responded, apparently in the throws of an existential crisis.
"I'm Boris. I do photography. Mark asked me to help him take photos of his army."
Delicious, I thought. About both the photography, and Boris' lustrous mane of hair.
Of course before any photos could happen, we needed to sort out Mark's hobby workshop nest: a mammoth task which a number of people have pitched in with, most notably Maisey (cheers again, dude). Thankfully, Mark left instructions about what to do with his hobby stuff. I strongly urge everyone else to do the same. My plan is to have a folder in my house labelled "Open in case of Charlie being very dead," and then tell people where to find said folder, and also share a folder in Google Drive in case the cause of death is a mild case of Exploding Firey House syndrome.
Eventually, we had everything in one place. A date was set, and Boris drove down to Oxford equipped with hench photography gear.
Our backdrop: both ghetto and ludicrously high budget. Any photo this big needs some sort of backdrop. Sadly, I didn't have one. We had to make do with the biggest plain objects I had to hand: three Realm of Battle Boards. Since that was already three comically expensive objects in play, I doubled down and used... I don't know how many pounds' worth of GW books to prop up the STRUCTURAL PLANK.
Those things on tripods in the photo above are flash bulbs set into diffusers. They link up with Boris' camera. It was very important to avoid looking straight at them when he took a photo.
The flashbulbs had their own screens, because of course that's a thing. Apparently. Whenever they went off, they then made a noise much like Iron Man's hand blaster things while recharging.
The original images he took are absurdly high res. Far too high res for Blogger, in fact, but there's a dropbox of some of the group shots here for the curious.
The photos are technically composites; Boris would set his focus to different distances, then stitched the photos together so that everything's in focus. The end results are vastly superior to anything I could have managed. This is his first time photographing miniatures, and fair play to him. Boris' face meltingly pretty portfolio is well worth checking out, unless of course you don't have eyes.
We've definitely underused his talents, given that the primary purpose of these group photos was to illustrate rather than offer cinematics, but he seems to have enjoyed the challenge; we may yet get him back to try taking some more atmospheric shots of the Beard Bunker's population of tiny things.
Next week is the final part of the showcase, and it'll be covering the Deathskulls. Expect kustom battle wagons and other glorious conversions.
____________________________ * Said cabinet has been dubbed the Mark Sarton Memorial Cupboard by Mark's widow Caroline, who retains her gloriously blunt sense of humour even in the face of serious adversity.